Last updated on April 30th, 2012
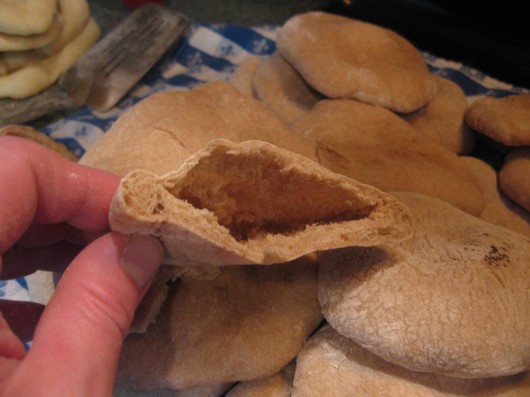
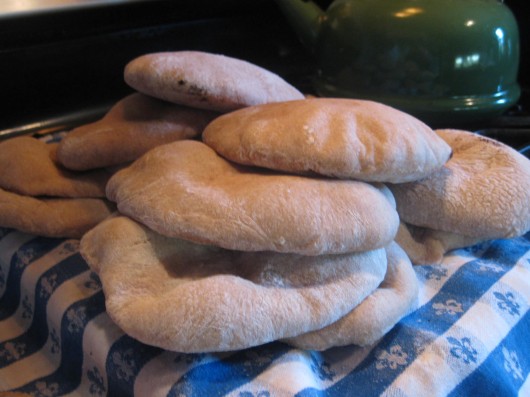
 MY KITCHEN resembled a Middle-Eastern bake-shop yesterday, as I turned flour, water, yeast, salt and olive oil into Pita bread. The recipe I played with, and how I tweaked my oven to get the dough to form a balloon, or “pocket:”
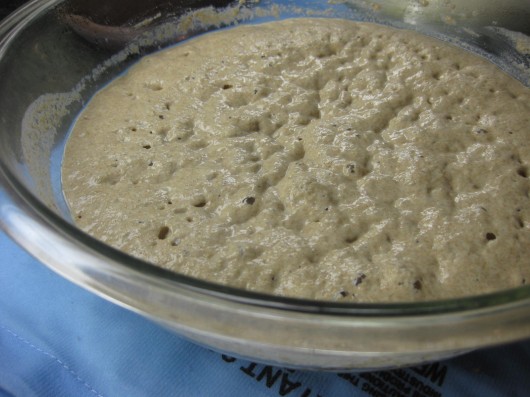
 I’ve tried many different pita recipes, and found most of them rather lackluster in taste. But one by Jeffrey Alford and Naomi Duguid, in their book Flatbreads and Flavors, produces robustly-flavored pitas. Why? Because the little breads begin their careers as a “yeast sponge.” A sponge is a mixture of water, yeast and flour that you let sit for about an hour. During this time, the yeast feeds on the flour, and a deep taste is developed.
If you have kids in your house, I promise you they’ll have fun watching the sponge. For it will twist, turn, bubble and burp, just like something out of a horror movie.
 Whole Wheat Pita Bread
Based on a recipe by Jeffrey Alford and Naomi Duguid, and tweaked, quite a bit, by me
Ingredients for about 16 breads, about 8-inches in diameter
One packet (2 tsp) active dry yeast
2 1/2 cups warm water
2 1/2 cups whole wheat flour
2 1/2 cups white all-purpose flour
1 Tbs kosher salt
1 Tbs olive oil
Special Equipment: a pizza-stone or cast-iron skillet, approx. 10-inches in diamter; a spray bottle, filled with water; at least 2 kitchen towels
1. Making the sponge – In a large bowl, sprinkle the yeast over the warm water. Stir to dissolve. Add 2 1/2 cups whole wheat flour, and then stir 100 times in the same direction to activate the gluten. Cover with plastic wrap, and let rest for at least one hour.
2. Making the Dough – Sprinkle the salt over the sponge; stir. Then stir in the olive oil. Gradually add the all-purpose flour until the dough is too stiff to stir. Turn it out onto a lightly floured surface and knead by hand for 10 minutes, or until the dough feels smooth and i elastic. Wash out and dry the bowl, then coat it with a little olive oil or spray it with vegetable spray. Return the dough to the bowl and cover with plastic wrap. Let rise until at least double in size, approximately 2 hours.
One hour before baking the pitas, place the pizza stone or cast-iron skillet on the bottom rack of your oven. Then preheat the oven to 450F.
3. Forming the Pitas – Gently punch down the dough. Divide the dough in half, then set half aside, covered, while you work with the rest. Divide the other half into 8 equal pieces and flatten each piece with lightly floured hands. Roll out each piece to a circle 8 inches in diameter and less than 1/4 inch thick.
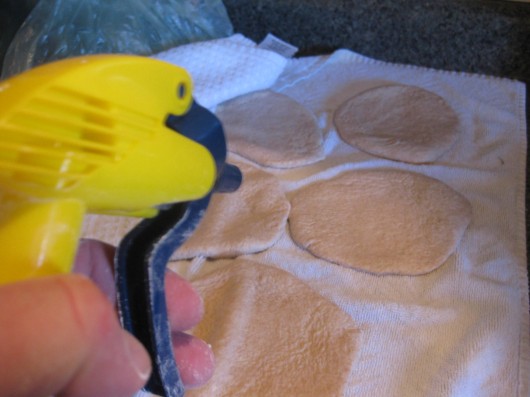
 4. Spritzing the Pitas – Set the rolled out breads on a damp kitchen towel, and spritz tops with water. Then cover with another kitchen towel. Spritz the top towel with water, too. Moist pitas, I find, are more likely to puff than dry ones.
5. Baking – Place one bread on the pizza stone or cast-iron skillet, and let it bake for 3-4 minutes, to see if it balloons. It it balloons, you’re all set. If it doesn’t, move the rack up one level, and increase oven temperature to 500F. These alterations, which are never mentioned in bread-baking books, made all the difference in my own pita-making adventure.
If you plan to eat the pitas right away, keep them warm in a kitchen towel. Otherwise, let them cool. Then stack them in zip-lock bags, and freeze. Frozen pitas will keep for months. To reheat easily, wrap one or two pitas in a paper towel and heat in the microwave for about 30 seconds.
Don’t miss anything at A Garden for the House…sign up for Kevin’s weekly newsletter.
Related Posts:
Paula Wolfert’s Hummus
Pain de Mie
French Baguettes
English Cream Scones

Cary Bradley says
Thanks for posting this Kevin, along with your personal tips. I am the hummus queen and often the only ingredient I miss having on hand for seemingly effortless snack, is pita bread. Now now more trips to store at last minute. These look gorgeous. Thanks too for sifting through boring recipes for us and for sharing this which I know will taste great! Looking forward to gurgling sponge, eek!
Liz Klingler says
The pita article and recipe look great, but I’m frustrated by inability to print it out. I even tried to
‘copy’ and ‘paste’, but that didn’t produce anything either. I also tried the ‘share’ icon underneath the article figuring I could send it to myself and print it out. No such luck. Is this something that can be remedied at your end, or am I just missing the obvious way to do what I am trying to do?
Thanks, I love your website.
Kevin Lee Jacobs says
Cary – That gurgling sponge is really, really cool. And thanks for the reminder…I need to link the recipe for Paula Wolfert’s hummus!
Liz – I have no idea why you can’t print or cut & paste this recipe. Let me try to email the recipe to you.
Prairiecactus says
Another terrific recipe to make for my egg-free, dairy-free grandson….thanks for sharing!
Brenda Johnson says
These pitas are so tasty!!! I had only ever had “store bought” and they tend to lack…. well- taste! I cut one up and made pita chips to have with my super bowl snack… delicious as well!!!! (And super easy- cut the round in half, then those halves into 1 to 2 inch pieces… pull the 2 “sides” of the pita apart- place on a tray in the oven and bake at 350 for approximately 10 minutes (check them after 8 to prevent browning- you want “toasted” not super hard and dried out) If you want to add flavorings/seasonings to them- spritz them with a bit of water and toss with your choice (garlic, parm. cheese, dill, chili powder,etc.) and then bake them….
Well done once again Kevin!!!
Kevin Lee Jacobs says
Prairiecactus – Not only are these pitas egg-free and dairy-free, but they are sugar-free and basically fat-free, too! Hope you’ll try them.
Brenda Johnson – I’m soooo glad you liked the pitas. It had not occurred to me to cut and separate the breads and then bake them for crackers. I’ll take mine with Parmesan, please!
Debbie Henthorn says
Kevin – I found your blog through a Pinterest pin about using vinegar to kill weeds. I’m so glad I stayed to visit a bit.
I love pitas and haven’t yet had success making them at home. When we had our home bakery, I SO wanted to make pita chips to sell, but the cost of store-bought pitas made it impossible. Both of my ovens are lined with unglazed quarry tile, so I can’t wait to try this recipe.
Thanks for taking the time to fiddle with the recipe!
Kevin Lee Jacobs says
Debbie Henthorn – Nice to meet you. With unglazed quarry tile lining your ovens, you’re all set to make these pitas!
Jingles Mercer says
Thanks to your suggestion I now have a use for a VERY large cast iron skillet. Like your recipe for popovers and English muffins, this is a definite to-do idea.
Maria Lally Clark says
I am happy to see this recipe. I am going try to make it with much less salt b/c of hubby’s salt restriction. I make great salt-free pizza dough, so will work on a similar tweak for this. MLC
Leslie says
I’ve been using another recipe for years but it doesn’t have a sponge—so I’m giving yours a try this weekend—I promised the kids I’d make up some hummus and I think the pitas would go well with the garlic scape pesto, too! Thanks!
Kevin Lee Jacobs says
Jingles Mercer – Cast-iron pans ROCK.
Maria – If you make the pita, let me know how it works out for you.
Leslie – Would be fabulous with either hummus or garlic scape pesto! Yum, yum, yum.
Shera Van Goor says
Hey Kevin! I made the pita breads this weekend and served with hummus. They were a huge success with my picky family. My daughter made a egg and ham sandwich the next day with one too. Amazing, how these taste so much better than the storebought ones. I will have trouble keeping these tasty things stocked up for my family. Thanks for sharing the tips, they were very helpful!
Kevin Lee Jacobs says
Shera Van Goor – So glad you tried — and your family liked — these pitas. I’ve made them over and over again — they really are addictive, and, as you said, so much better than the dried out ones from the supermarket.
Joan Dunstan says
Kevin have you tried any other flour instead of wheat? I would love your suggestion for options you think would be sucessful. Your Slow Roasted tomatoes were wonderful!!!
Kevin Lee Jacobs says
Hi Joan – I have not tried to make gluten-free pita. But someone else has:http://wholelivingdaily.wholeliving.com/2011/02/you-asked-for-it-totally-allergy-and-gluten-free-pita-bread.html
Dayle says
Can I just use white flour no wheat?
Kevin Lee Jacobs says
Hi Dayle – Yes, you can use white flour instead of whole wheat.
Lauren says
Hi, I’m a first timer. How long do they last? I’m wondering if they would be good 5 or 6 days later without going stale or moldy. Any suggestions? Thank you!
Kevin Lee Jacobs says
Hi Lauren – Once the pitas have cooled, just stack them in zip-lock bags, and freeze. Frozen pitas will keep for months. To reheat easily, wrap one or two pitas in a paper towel and heat in the microwave for about 30 seconds. Delicious!
Colleen says
Any suggestions? I followed these directions to a t and only small bubbles appeared never the full balloon?thank you”
Kate says
Hello again, Kevin! I have been using this recipe for awhile (fabulous book!), but your additions are great. Thank you. My pitas are now even better than before.
john says
I don’t want to come across as being a fresh or mean but I guess its because I came from an era that used recipe cards. I sit here with a pen in hand and paper very, thankful that you shared this recipe that some would charge a fee for! How busy have we made our lives these days that it takes to long to write a recipe with a pen, pencil, crayon or some other form of writing apparatus onto a piece of paper or has this mindset just expect others to do things for them???? Thank you for sharing and going out of your way to help others!!!!!