Last updated on July 4th, 2021
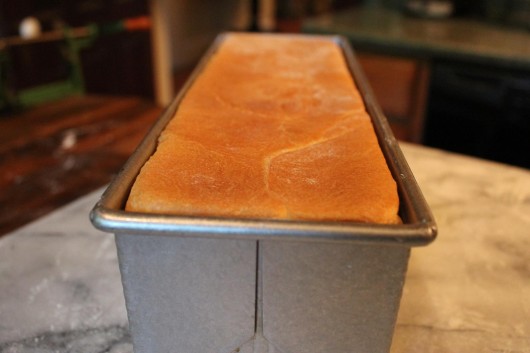 I LOVE FRENCH SANDWICH BREAD, or Pain de Mie. It’s my “go-to” bread for sandwiches, Melba toast, French toast, croutons, and fancy canapes. To form a perfectly-rectangular loaf, I bake the bread in a Pullman pan. Here’s the recipe for this loaf of love, along with the answer to your burning question: “What’s a Pullman pan?”
 A Pullman pan is an old-fashioned bread pan. It has straight sides and a nifty lid that slides over the top. The lid keeps the bread from forming a crown as it bakes. This flat-topped, straight-sided loaf is a pleasure to slice. And its entire crust can be removed with just 6 flicks of a knife.
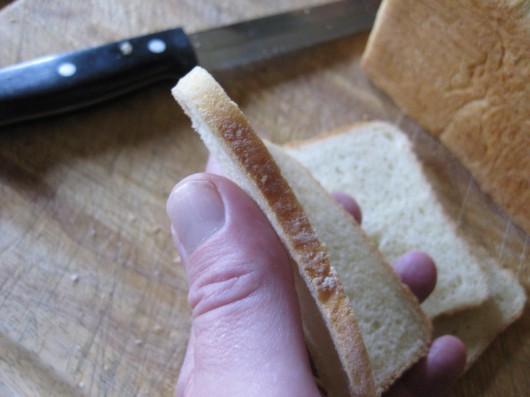 Counting carbs? You’ll be happy to know that Pain de Mie, if baked in a Pullman pan, can be sliced paper-thin, as above.
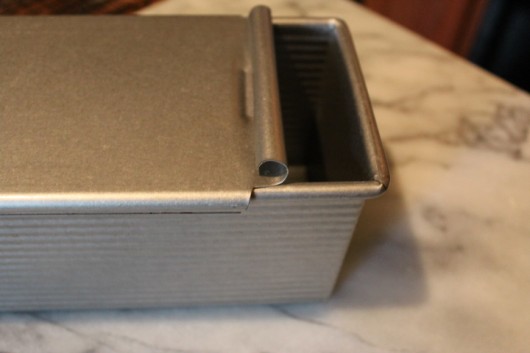 Now, if you want to purchase a Pullman pan, I can highly recommend the 13x4x4-inch one that I use. It’s manufactured by USA Pan, and it’s built to last. It’s a breeze to clean, too. Nothing sticks to it. You can purchase this pan for around $25 at better kitchen-supply stores, and also from Amazon.
Shall we bake some Pain de Mie? Here’s the long version, followed by a much shorter, copy-and-paste one:
Pain de Mie in a Pullman Pan
Ingredients for one 13x4x4 loaf
1 package active dry yeast (2 1/4 teaspoons), dissolved in 1/4 cup warm water
1 2/3 cups whole milk, scalded and then cooled
4 3/4 cups all-purpose flour
2 1/2 tsp Kosher salt
6 Tbs cold, unsalted butter
Special Equipment – a standing mixer, outfitted with a dough hook; a large bowl; a rolling pin for smashing the butter; a pastry-scraper; and one 13x4x4 Pullman pan
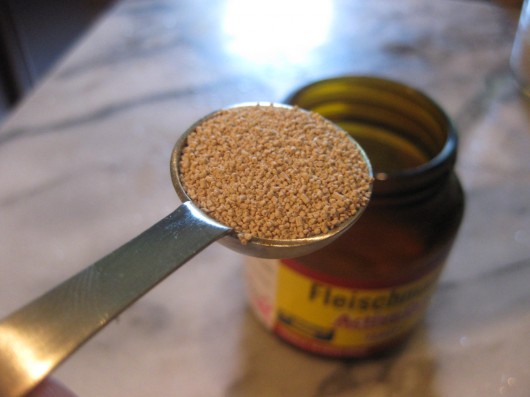 To start, dissolve the yeast in warm water, and let it proof for 5 minutes.
And here’s a tip: Instead of buying yeast in little packets, buy it as I do — in a glass jar. You’ll save money that way. Refrigerated, yeast will remain viable for at least six months.
 While the yeast is proofing, scald and cool the milk. I do this the easy way, by pouring the milk into a glass measuring cup, and then microwaving it on “High” for exactly 2 minutes. After cooling for 3 minutes (or to 110 degrees F), the milk is ready for use.
And has anyone noticed that glass measuring cups are made rather poorly these days? Mine, pictured above, is maybe 3 months old. But already its red markings are wearing away. Let me know if you’re having this same issue with your own glass measures, too.
Misery loves company.
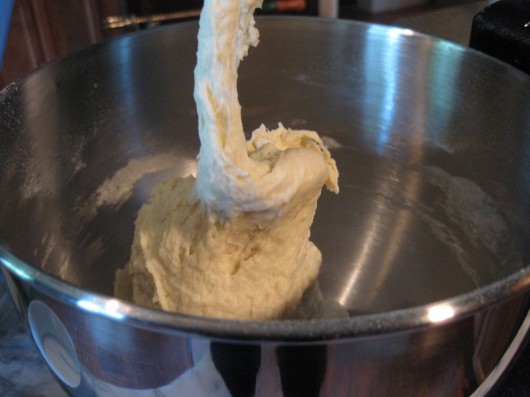 Pour the flour, milk, salt, and yeast mixture into the bowl of your standing mixer. Blend at low speed for about 10 seconds. Then increase the speed to medium (number 4 on my model) for 2 minutes, or just until the dough masses on the hook attachment, as pictured above. Let rest for 2-3 minutes. Then blend again at medium speed for another 2 minutes. Let rest while you prepare the butter.
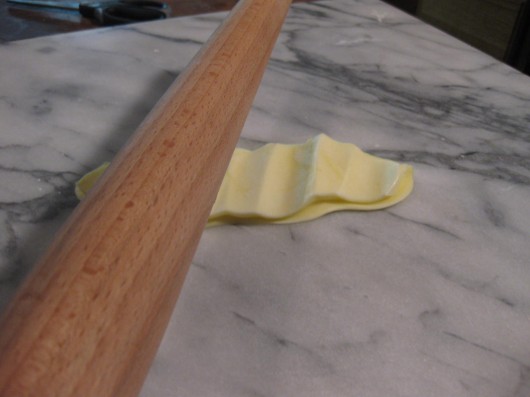 Here’s my favorite part of Pain de Mie-making. Take a rolling pin, and use it to smash down the cold butter. Be brutal here. You want the butter to become malleable, so that the dough will accept it without much fuss.
Scoop up the flattened butter with your pastry-scraper, and carry it to the standing mixer.
 Then, with the mixer running at medium speed, add the butter one 1/2 tablespoon at a time. Stop the machine once all of the butter has been incorporated into the dough.
Can you tell how delicious this bread is going to be?
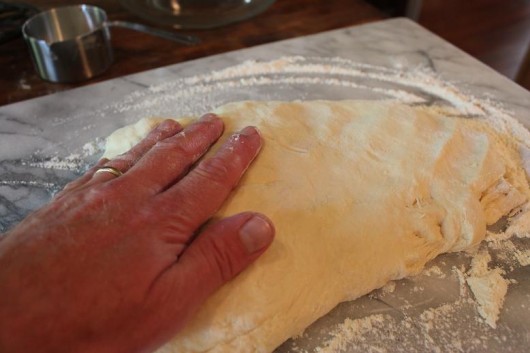 Dump the dough, which should be sticky but elastic at this point, onto a lightly-floured board. Then pat it out with your floured hands.
 Fold the dough into thirds. To do this, take one end of the dough, and flip it over the middle, as above.
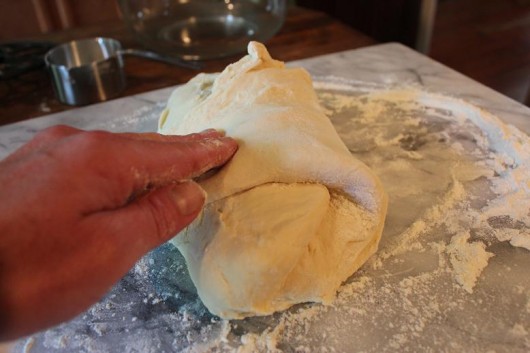 Then flip the other end of the dough over the top.
I realize I’m making you wade through lots of pictures. But if you’ve never made bread before, you might not know what “fold the dough into thirds” means.
And that would upset me to no end.
Place the dough in a large bowl, cover the bowl with plastic wrap, and let it slowly rise until tripled in volume — about 3 hours in a 75 degree kitchen.
 And here’s another tip. If your house is colder than 75 degrees — mine usually is — just set the bowl of dough on an ordinary heating pad. I set mine at the “medium” setting.
And please note the magazine on the counter next to my heating pad. It’s the Italian decorating magazine called Country & Country.
 Believe it or not, I’m the centerfold in this month’s issue.
I apologize for that bit of self-promotion.
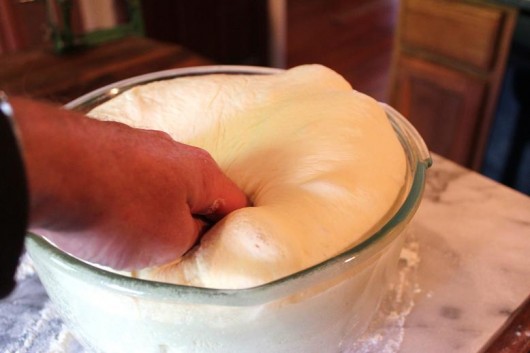 With floured fingers, deflate the dough and then pour it onto your floured board. Quickly wash out and dry the bowl. Fold the dough in thirds, just as you did earlier, and then return it to the clean bowl. Cover the dough, and let it rise until almost tripled in volume — about 2 hours.
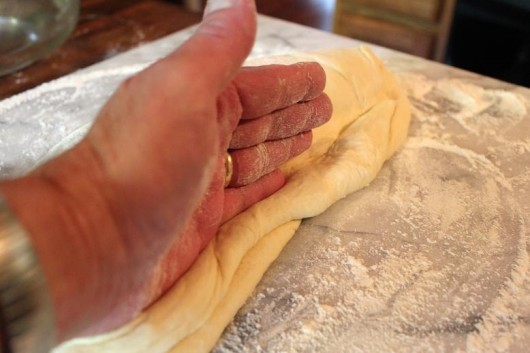 To form the dough, first pat it out. Then fold it in half lengthwise, and use the side of your hand to seal the edges. As you can see, I prefer the karate-chop sealing-method.
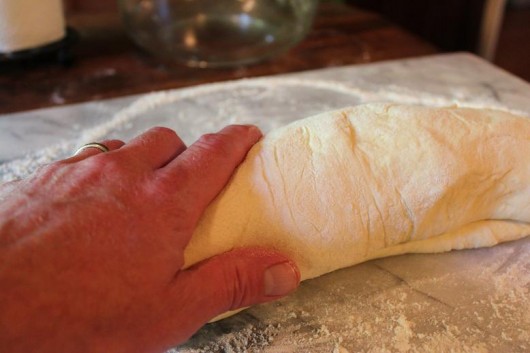 Next, flip the dough so the sealed edge is on the bottom.
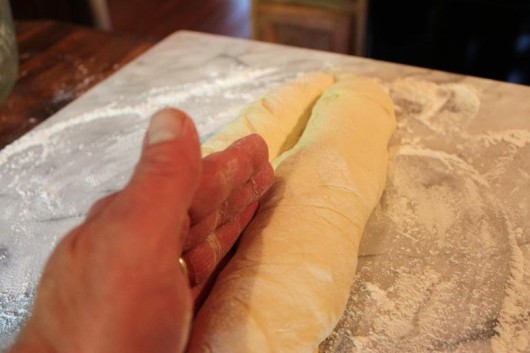 Now karate chop a ridge down the center of the dough. Then fold at the ridge and karate chop again to seal. All this martial-arts manipulation is to create surface tension. Repeat the karate-chopping and folding once or twice more, until the dough appears fairly smooth. Then pinch the underside of the loaf to seal.
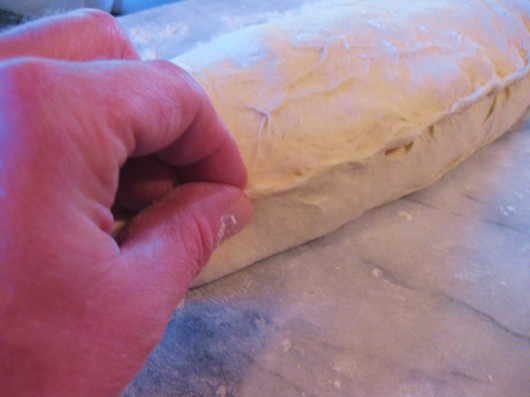 There is nothing I like better than pinching the seams of dough. It’s right up there with pounding the heck out of butter.
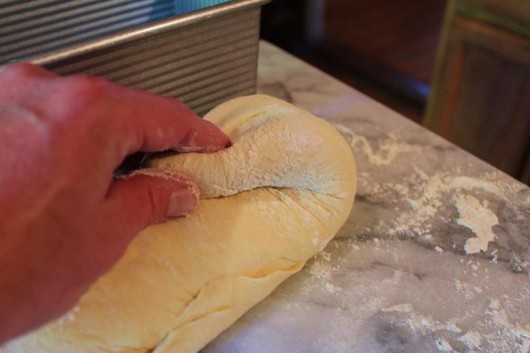 If, after all this manipulation, the dough becomes longer than your Pullman pan, don’t despair. Just fold the ends over and pinch to seal. You want the length of the loaf to match the length of your pan — 13 inches.
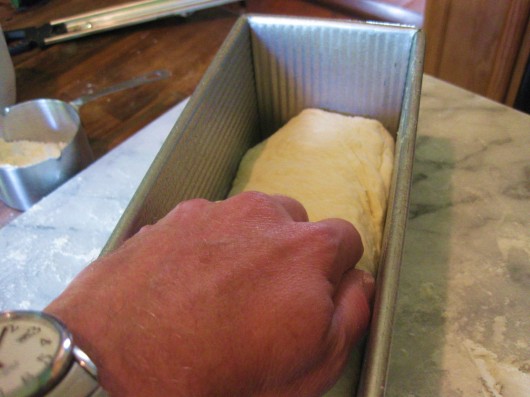 Place the formed loaf in the pan, gently pat it down, and then cover with plastic wrap. Let the dough rise until it reaches 1 inch (not more!) from the top of the pan — about 30 minutes.
Now is a good time to preheat your oven to 435F. Set the oven rack at the lower-middle level.
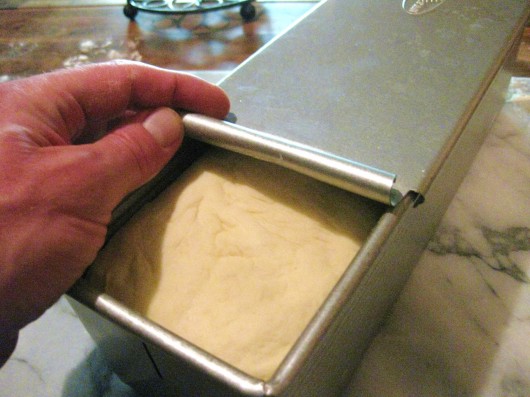 Slide the cover over the pan. Bake in the preheated oven for 40 minutes.
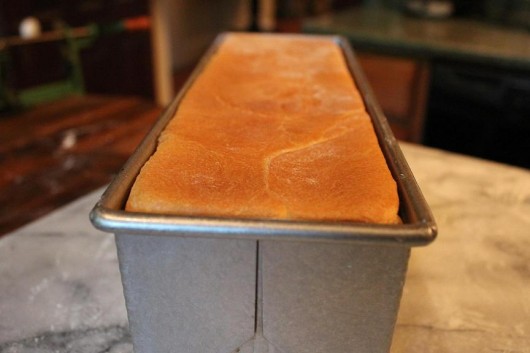
Is this bread beautiful, or what?
 Gently ease the loaf onto a cooling rack. I like to set the rack atop the Pullman pan to permit air-flow beneath the loaf. This helps the bread to cool faster.
Once the bread has thoroughly cooled, you can turn it into all the things I mentioned earlier — sandwiches, Melba toast, French toast, canapes.
 Toasted and buttered, Pain de Mie is so crunchy and delicious it ought to be illegal.
I hope you’ll try this bit of heaven some day. The bread freezes perfectly well.
Need a copy-and-paste version of the above recipe? Here goes:
Pain de Mie in a Pullman Pan
Ingredients for a 13x4x4-inch loaf
1 package active dry yeast (2 1/4 teaspoons), dissolved in 1/4 cup warm water
1 2/3 cups whole milk, scalded and then cooled
4 3/4 cups all-purpose flour
2 1/2 tsp Kosher salt
6 Tbs cold, unsalted butterSpecial Equipment – a standing mixer, outfitted with a dough hook; a large bowl; a rolling pin for smashing the butter; a pastry-scraper; and one 13x4x4 Pullman pan
1. Mixing the dough — Pour flour, milk, salt, and the yeast mixture into the bowl of your standing mixer. Blend at low speed for about 10 seconds. Then increase the speed to medium for 2 minutes, or just until the dough masses on the hook attachment. Let rest for 2-3 minutes; blend at medium speed for another 2 minutes. Let rest while you prepare the butter.
2. Pounding the butter — Use your rolling pin to smash down the cold butter. You want the butter to become malleable, but not so soft that it becomes oily. Scoop up the flattened butter with your pastry-scraper, and then carry it to your standing mixer.
3. Adding the butter to dough — With the mixer running at medium speed, add the butter one 1/2 tablespoon or so at a time. Stop the machine once all of the butter has been incorporated into the dough.
4. The first rise — Dump the dough, which should be sticky but elastic at this point, onto a lightly-floured board. Pat the dough out, then fold it over on itself 3 times. Place the dough in the large bowl, cover the bowl with plastic wrap, and let it slowly rise until tripled in volume — about 3 hours in a 75 degree kitchen.
5. Deflating the dough, and the second rise — With floured fingers, deflate the dough and pour it out onto your lightly floured board. Then quickly wash out and dry the bowl. Fold the dough over on itself 3 times, just as you did in step 4. Return the dough to the clean bowl, cover, and let rise to almost triple — which this time will take about 2 hours.
6. Forming the dough, and the third rise — Pat the dough out, fold it over on itself, then use the side of your hand to seal the edges. Then flip the dough so the sealed edge is on the bottom. Now, using the side of your hand, karate-chop a ridge down the center of the dough. Then fold at the ridge and karate chop again to seal. Repeat the karate-chopping and folding once or twice more, until the surface of the dough appears fairly smooth. Then pinch the underside of the loaf to seal. Place the formed loaf in its pan; cover the pan with plastic wrap. Let rise until the dough reaches 1 inch (not more!) from the top of the pan — about 30 minutes. Preheat the oven to 435F; set rack at the lower-middle level.
7. Baking – 40 minutes at 435F. Slide the lid over the pan, and bake in the preheated oven for 40 minutes.
8. Remove the lid and gently release the loaf onto a cooling rack. To increase air-circulation and thus quicker cooling, place the rack atop the lidless Pullman pan. Let the bread cool thoroughly before slicing.
Don’t miss anything at A Garden for the House…sign up for Kevin’s weekly newsletter.
Related Posts:
Snowshoe Naan
Perfect Popovers
English Muffins

Sandi says
Mmmmm, warm homemade bread. This reminds me of my stay at home mom days in the 70’s–I’d started making all my own bread then, baking once a week. 3 loaves of white, 2 loaves of molasses brown bread. The kids loved it. Will have to find some pullman pans and get back to it.
Congrats on your centerfold!
Sandi says
Hi Kevin, a question about your pan. I found a USA pullman pan on Amazon that is coated with Americoat (silicon). They don’t advise oven temps over 400. Is your’s the same type pan and if so, have you had any problems with it at the higher temp? Quite a few bread recipes bake at over 400 degrees. Do you have another brand to recommend? Thanks. Sandi
Kevin Lee Jacobs says
Hi Sandi – That’s the same pan I use for Pain de Mie — which bakes at 435 degrees. No problems to speak of, and I’ve been baking this bread almost every week — in the same pan — for the past 9 months. The “Americacoat” is as good as ever.
Erin says
Yum! I would have fun making it but it is too much bread for me. I do make bread dough in my bread maker (1 lb) and then bake it in the oven.
I wanted to chime in on dough raising methods. I turn on my oven just long enough to take the chill off of it. Then I turn on the oven light and raise my dough in there. Works for me!
Erin says
P.S. Congratulations on being a centerfold! I see more of those for you in the future!
Beth says
I love you for posting this recipe. It’s been far too long since I’ve made bread, and as a confirmed Francophile, I must make this soon. Your directions and pictures are detailed and excellent! Thank you so much for posting this!
Kevin Lee Jacobs says
Hi Erin – Glad you liked the “centerfold,” and thanks for submitting your dough-rising tip. My house is so old and drafty that I have to rely on the heating-pad!
Beth – Nice to meet another Francophile!
Linda Totten says
You go right ahead and boast.. You should be proud to be in the magazine.. The bread looks delicious, may try this winter when all may outside duties are finished. Thanks for sharing.
Denise in NJ says
I see that Amazon has this pan in two sizes. The 9 inch would be better suited for my husband and me – I think the 13 inch would be too large and the bread might mold before we finish it. So I have 2 questions: 1) How long does your loaf last before it molds? 2) How would I adjust the recipe for the 9 inch pan?
Kevin Lee Jacobs says
Linda Totten – If you try the bread, I hope you’ll let me know how it turns out for you.
Denise in NJ – This bread is so incredibly delicious that it doesn’t last long at all. At least, not around here. And I’m the only one eating it! Keep in mind that you can freeze the entire loaf, and just use it as you need it. I’ve made this bread as a smaller loaf, too, using a traditional bread pan with an improvised cover. Here’s the recipe for the smaller version.
badger gardener says
WIsh I had a nice slice of homemade bread right now. In the years that I’ve learned to love the kitchen, I’ve been hesitant in bread baking or anything where yeast is involved. Silly, I know. Early results with pizza crust didn’t turn out so great so perhaps that was the reason. Just maybe I’m ready to give it a try again.
How cool to see you and your garden as centerfolds. Is that an Italian-only publication? Can we find it here in the states?
Kevin Lee Jacobs says
badger gardener – If your first attempt was pizza dough, I don’t blame you for being afraid of yeast breads! (Pizza dough can be a pain to work with.) But I hope you’ll take the plunge and try one of my other breads.
As for the magazine — it might be available in the U.S. at newsstands that carry foreign periodicals. I’d like to obtain more copies!
Brenda Johnson says
Congratulations centerfold man!!!! That’s wonderful! Speaking of wonderful…. I just had the best french toast ever made with your Pain de Mie and covered with fresh raspberries from my dad’s garden (and butter and maple syrup of course!) Delicious!!!!! Thank you again!!!!!
Kristina says
I just made 3 loaves of cinnamon raisin bread yesterday and was wondering why the recipe called for scalded milk. Any ideas? This recipe looks great, I’ll have to try it next. Thanks again for all your wonderful posts!!
marty says
I had pain de mie made from the recipe on the King Arthur flour site for breakfast–great for thin buttery toast with a cup of tea! Now I will have to try your recipe, too, which looks delicious. Thanks for all the lovely hard work you put into your creations–you inspire me here in my just-bought cottage on the Gulf coast of Mississippi, with NO garden or plantings of any kind, a blank slate of grass and overgrown bushes I’m not sure how to tackle. I’ve been avoiding the issue during the late summer heat, and baking instead. Looking at my yard awaiting, I appreciate what you have created even more.
chris says
Hi Kevi,
do you have any recipes or handy hints for making Salt Rising bread? There was a local bakery that made the best bread and unfortunately, it burned down and never rebuilt. I would love to be able to make some for my Mom.
Kevin Lee Jacobs says
Brenda – So glad to hear that you enjoyed the bread!
Kristina – From reports I’ve read, scalding is necessary in order to de-activate an enzyme in milk which would otherwise interfere with the production of yeast.
Marty – Have fun designing gardens for your newly-purchased cottage. I started with a blank slate here, too (if you don’t include the asphalt parking lot I removed in order to create a rose garden!).
Chris – I have never made Salt Rising Bread. Sounds intriguing! You can find a recipe here. I might try it, too. I’m a fearless cook.
Helen says
The reason the lettering is coming off your glass measuring cups is that they are no longer made by Corning Ware. Corning sold off the Pyrex brand about 10 or 12 years ago and the new owners decided to make the product off shore. It no longer makes the glass ware the same way. That is why you hear about pyrex blowing up in the microwave and the lettering wearing off. All you can do now is go to estate sales and hopefully find some of Grandma’s old pyrex.
anne says
I can almost smell the bread baking! Thank you. I love receiving your posts.
Angie says
This recipe looks delicious, and I am sure we would love it. However, we are trying to incorporate more whole grains into our diet and I was wondering if you have ever tried this recipe using half whole wheat flour and half all purpose flour, and if you had, how did it turn out? Hate to try it and not have it work, if someone else has already experimented it would save me the trouble. Thanks!
Kevin Lee Jacobs says
Helen – Thanks for confirming my suspicions. My mother still has Pyrex cups she purchased in the 1960s, when Pyrex was…well, still Pyrex!
anne – So glad to hear you like the weekly newsletter.
Angie – I have every intention of trying this recipe with half AP and half whole-wheat flour. Will let you know how it turns out. (I’ll have to change the name…as I understand it, pain de mie is a white bread.)
Martha says
Oh, yea, thanks. I own one of those pans and never found the exact right recipe for it.
I grind my own grain in an electric grinder so I can fine grind wheat and see how a half whole wheat version works in our kitchen.
Lynn says
Yes the bread looks lovely . But, APOLOGIZE ?!! Are you a tad crazy ??? CONGRATS on your center fold spread in the Itailian Mag, that is HUGE ! Way to go Kevin !!! 🙂 xoxox LOL!
Sandy says
Kevin,
I had the same problem with my pyrex. Called the company and they replaced for free. I just had to tell them where I purchased. So far the new “batch” is living up to old standards. They did ask me if we had a professional dishwasher. We had Bosch at the time. Different dishwasher now and no problems.
marty says
I have made pain de mie with the addition of whole wheat flour, and it does affect the rise considerably, even with less than half of the flour converted to whole wheat, and even using white whole wheat. There is a whole wheat version on the King Arthur website that I haven’t tried yet, though.
Sarah says
I L-O-V-E your recipes. I bought a Pullman pan about a month ago and have been trying recipes left and right for the perfect loaf. They’ve all failed. So excited to try yours!
Pat E. says
Wow. I haven’t made bread in a while, but this recipe sounds scrumptious–and not that difficult to make. Do you think whole wheat white flour would work well? I like to use the higher fiber flours. I think I’ll order the pullman pan you suggested. It sounds as if it might have some other uses as well.
I love your site! Discovered it by accident and just love your articles and photos, as well as your sense of humor. I’ve shared it with my Master Gardener group and many of them have replied that they think it’s great! Keep up the good work.
beetree says
Your bread looks amazing! And, I’m pretty sure that the butter smashing and seam pinching would be my favorite part (besides the eating bit). 🙂
Julie says
Wow, I make bread but not a recipe that requires 5 hours of rising! And you do this every week?
Christina Pilon says
Thanks for taking me to the next level of baking bread…definitely going to try it.
Kevin Lee Jacobs says
Julie – Believe me, this bread is worth every minute of rising time. I make it every week — and sometimes, 2 or 3 times in a week!
Christina Pilon – If you make this bread, I hope you’ll let me know how it turns out for you.
Madfortulips says
Just got my Pullman pan! Have you ever tried substituting rice milk for cows milk? I am currently off cow’s milk 🙁 Do you grease pan before placing dough in it?
I just made your French baguette today! Loved it. My daughter is in Paris for the year so we have been having ” bread envy” and this helped! Bread was crunchy on outside and chewy on inside…perfect! How do you store it overnite?
Kevin Lee Jacobs says
Madfortulips — Congratulations! Hope you’ll make Pain de Mie in your Pullman pan. I don’t grease my pan, but if you want, you can certainly coat the interior with a non-stick spray. Real Pain de Mie contains cow’s milk — not sure how the bread will turn out if you use a non-dairy substitute.
And…so glad you liked the French baguettes. These can be stored overnight in a plastic bag. For longer storage, it’s best to freeze the bread.
Maria says
I enjoy every post you share with us, right now I am trying to make a gluten free bread in my old bread maker machine without very much succes. I congratulate you for the Italian Magazine article and hope you will have many more success storys like that one ! Have a good week!
maureen says
anyone have a gluten free recipe that works in the pan? do you still cover the bread dough while baking? THANK YOU!!!
chris says
Ms tulips
32.Madfortulips says:
September 27, 2012 at 12:05 am
Just got my Pullman pan! Have you ever tried substituting rice milk for cows milk? I am currently off cow’s milk Do you grease pan before placing dough in it?
I just made your French baguette today! Loved it. My daughter is in Paris for the year so we have been having ” bread envy” and this helped! Bread was crunchy on outside and chewy on inside…perfect! How do you store it overnite?
try goat/sheep milk if you can get it. Cow juice gives it a certain flavor rice mlk simply won’t do. Dairy adds something to some dishes (i feel for kosher people and allegric types), that soy/rice etc will not address, mouth feel flavor and the ability to “keep”.
this is a part A B lke epoxy glue
You could use take 1/2 water half the flour all the yeast and 1/2 salt and mix in 1 bowl, allow to sit over night then mix the rest of water and rest of flour in anothre bowl (no yeast) and sit it next to the other bowl for overnight. You will have created a saur or poolish (of sorts). next day mix in to yeast mixture an appropriate amount of oil (be creative use some almond or hazelnut or coconut) , any will do , but flavored oils could be nicer. then mix in the second bowl (flour water no salt) mix knead 10 minutes allow to rise deflate a short knead, allow to rise again, deflate gently, shape, put in a pan to rise.
This is a technique that is very very useful with real rye bread as you get exactly 1 rise. But you knead the “sour” . SO the white flour can be soured (half of it ) the rye is mixed into part of the water, on day 2 or st stage 2 you mix in everything let sit 10 mins gentle knead, then shape- rise – bake. If you try for 2 rises with rye you get lead bread. I figured this out by trial and error, pure serindipity. Then after i thought I invented something, I found out this is normal in german/polish/italian bakeries. Whole grains (especially rye) unheated milk will cause break downs in gluten, hence flat bread 🙁
ciao
chris says
right now my kitchen smells wonderful. I shoulda made it yesterday so it would be ready for the chicken marsala……..then again tomorrow could be a soup day, lentil, chicken, or dare I rabbit caccitore? mmmmmmmm, no wonder I am fat, and a glass of red wine AND a good german beer……
Libby says
Thanks so much for this. Santa is bringing me a Pullman pan.
If you would like some “pan lore” – I heard they called it a Pullman pan because the square loaves would stack up in the cupboards of a train pantry without wasting any space. Kinda tight in those train cars so I am guessing what I heard is true.
Grazyna Kirsch says
Happy New Year, Kevin.
Just wanted to let you know that we bought the pullman pans (2) and finally tried to bake the bread. Thanks a lot. Came out fantastic. It’s definitely an addition to my husbands repertoire (he’s the baker in the family, I just help). Great bread for open face danish sandwiches. Thanks for the recipe and very clear instructions.
Jennifer Kulp says
The bread was fabulous and I was informed that I would be making this twice a week by my daughter. It was well worth the time involved but I won’t be so lazy next time and will get out the heating pad. The third rise didn’t quite make it high enough and it turned out slightly rounded on top.
John Farrell says
In response to a request from a friend in the catering business, I provided a pan de mie using my usual 60% whole wheat, 40% all purpose flour recipe. Still waiting for a critique and report of its use for canapes at a catering gig. My hope is they will dry run the canape experiment and I can be there to see the result. More later.
John Farrell says
In response to a previous Speak Your Mind comment . . .
The name “Pullman” was derived from its use in the compact kitchens of the Pullman railway cars. Although the Pullman Company is credited with inventing the lidded baking pans used to create the square loaves, square tin pans existed long before the railroad company. European breadmakers began using the pans in the early 18th century to minimize crust. However, the loaves were selected by Pullman for use on his trains.[2] Three Pullman loaves occupied the same space as two standard round-topped loaves, thus maximizing the use of space in the Pullman kitchen.[3]
Kevin Lee Jacobs says
Jennifer Kulp – So glad you tried — and liked — this version of Pain de Mie. You’ll find that the heating pad dramatically reduces rising-time. I use the pad every time I make yeast bread in winter, because I live in a very cold and drafty old house!
John Farrell — Hope you’ll let me know how your whole wheat version worked out for canapes. And you are right about the pan’s European origin. It is, from what I’ve been told, officially a French sandwich-loaf pan.
Erica says
Looks amazing! Wonder if I can make this using gluten free flour? Hmmmm…
cupajoe says
I recieved a KitchenAid mixer for Christmas and have not bought bread since. I also purchased this exact Pullman pan so that I could make sandwich bread for my kids and have been trying recipes left and right to see what we like. I found your site on Pinterest and am trying this bread as we speak (I have a few more hours of rising time before I can tell you how it turned out-lol) Thanks for the great instructions!
cupajoe says
This turned out WONDERFUL! I was sure I was doing something wrong because the dough was so soft, and the butter just seemed to melt into the mixture. I was also concerned that the dough didn’t seem to fill the pan much on it’s final rise. I baked it and it came out perfect! My oldest son is my loaf taste tester and told me that this was the best loaf I had made yet! Thanks for the great recipe!
Kevin Lee Jacobs says
cupajoe – You have a very wise son. So glad you obtained the Pullman loaf pan, and tried my recipe.
Lisa Kadison says
Merci beaucoup for such delicious inspiration! I bought a Pullman pan when you first posted this recipe but haven’t tried the recipe until now — the first loaf looked just lovely before I slipped it into the oven and now my kitchen smells divine! It’s been so cold here that it took 24 hours from start to finish, even with your handy and oh-so-smart tip to warm from below with a heating pad, but I’m certain that my teenage son will agree it was worth the wait.. Thanks for adding some French panache to our wintry fare!
Kevin Lee Jacobs says
Lisa – You’re welcome! I’m so glad you tried this recipe.
Brianna says
Hi there to every body, it’s my first pay a visit of this website; this webpage consists of remarkable and truly good data for visitors.
Dorothy says
I bought the Pullman Pan, Great pan. only problem was this was my 1st try doing bread, It came out Heavy…Used Red Star quick-rise yeast (dry) mixed it with 1/4 c water. Did the milkk in micro-wave, and let it cool to 110. added the mixture of yeast and water together with the cooled milk…. blended with flour and pounded butter, 1 St & 2nd rise ok only the third rise didn’t rise…. place it into pan. and let set 35 mins. still not rise, getting late so I cooked it, Pullman pan did its job, but my bread came out half the size of the pan and very heavy…..Help…what did I do wrong????
Debra says
Hi Kevin, just viewed a couple of your recipes that I cannot wait to try out. Thanks so much for the beautiful photo instructions. A suggestion for you — you should put your name in the copy and paste version of the recipe so that people can refer back to your site. Thanks again, wonderful work!
COBAYLEY says
First, thank you so much for a great, great blog. I enjoy every article. I too found you on Pinterest and I’ve got you bookmarked twice so I don’t lose you and just to make sure, I get an email when a new article is published.
I’m on the hunt for the bread pan above. Dietary restrictions for my husband almost demand we make our own bread. I enjoy the step by step pictures. I hope you never stop doing that.
Congratulations on the magazine spread..well deserved…just the beginning I’m sure..I hope you never get to famous to give up these great reads….
Lori G. says
Brilliant! Just brilliant! A heating pad to raise the dough? I’m ashamed I didn’t think of it myself! This looks fantastic and answers the question of how ‘they’ make the bread my kids liked so square. I’ll be ordering a pullman pan soonest and trying this out on my next available day off.
Kudos to you, Kevin, for your magazine feature and your brilliant blog. I’ve shared it with many of my friends and they all love it to bits. Thank you.
Faye says
Ha! Thanks for bringing the pan to our attention; I have to find one. I wonder if it would work with Jim Lahey’s method to make bread since it has a lid. Worth a try, but first I have to find one 🙂 Thank you!
Kim says
I’ve got my grandmother’s pans and they are a treasure!! As far as you measuring cups, if you can’t get them replaced like mentioned above, I found a set from 1 cup to 2 quart that has the measures raised in the glass. No paint to come off, easy to see, and they are actually made with pour spouts that don’t dribble! They are Anchor Hocking.
Shirley says
I make bread every week, I let my bread machine do all the “grunt” work, and also let it rise there…then it comes out goes into my bread pan and after rising again it gets popped into the oven. I always cook it at 325-350 degrees and ONLY 28 minutes. Perfect loaf each and every time without tasting heavy or chewy. I arrived at this method (after many, many trials (and failures) for almost 45 years..works for me.
Henrietta says
I have a recipe that is similiar to yours. I have been baking bread for 60 years and I knead my bread by hand and to get it to rise in the summer I set the dough on the side porch aand in the winter by the woood stove. thanks for sharing your recipe
Michelle Darensbourg says
Have you ever tried sourdough in the pullman pan? Was wondering if it would give it almost more of an english-muffin bread consistency?
Ashley says
I just received my Pullman in the mail today and I really want to make your recipe. It looks amazing! My issue is that I do not have a stand mixer. We had one for a while and it got dropped off the end of a moving truck and didn’t work after that 🙁
I haven’t had the $$ to replace it. Is it possible to make this by hand? Details/suggestions?
Thanks so much!
Kevin Lee Jacobs says
Hi Ashley – You can make Pain de Mie entirely by hand, just as I have in the past. Keep kneading the dough until it no longer sticks to your work surface. And be sure to incorporate the butter in tiny increments. And…let me know how the bread turns out for you!
casein protein says
Good day I am so happy I found your blog page, I really found you
by accident, while I was researching on Bing for something else, Anyways I am
here now and would just like to say thanks a lot for a remarkable post and a all round interesting blog
(I also love the theme/design), I don’t have time to browse it all at the minute but I have book-marked it and also included your RSS feeds, so when I have time I will be back to read a lot more, Please do keep up the fantastic work.
cathy a fox says
hi kevin,
bread looks wonderful. I am going to make it. nice centerfold too. thanks for all.
Kate S. says
Hi Kevin, I really enjoy your posts. I live in Panama and have never seen unsalted butter where I live. I’m not much of a baker. Does the added salt in butter affect the outcome of the loaf?
Kevin Lee Jacobs says
Hi Kate – Salted butter will affect the taste of the bread, but not its texture. Most bakers (including me) prefer to use “sweet” (unsalted) butter for better taste-control.
Cathy L. says
Hi, I was wondering how many lbs of dough goes into the Pain de Mie Pan. I made the recipe and found that it was a little too heavy for my taste. So I was wondering if was putting too much dough in the pan. I am fond of a lighter texture in bread but I do like the Pain de Mie pan, though and would like to use it more. Thank you for your help on this and this web site. It’s great..
n scale layout plans says
Hi! I’ve been following your blog for a while now and finally got the bravery to go ahead and give you a shout
out from Dallas Tx! Just wanted to mention keep up the
fantastic job!
Mary Farrell says
I have looked at Pullman pans in catalogs for years, but never capitulated. Now I may have to try it. I just discovered the “no knead, long rise, artisan bread method, and am enthused about baking more of my own bread again. I kneaded 14 loaves a week when my kids were growing up. Having a Pullman pan back then would have made the bread go a lot farther.
Dia Koether says
this looks and sounds delicious! I will be trying it as soon as I purchase the pan, cheers!
Julie says
I can’t wait to try this. I don’t think I will wait for the Pullman pan though so I appreciated seeing the improvised pan. I also hate the new measuring cups. Helen has a great idea in seeking them out at estate sales, etc..
Asmae says
I love the picture of the slice of bread with the melting butter!
Vicky says
After the first rise, do you fold the dough over itself in thirds one time or three times? The loaf looks delicious!
Kevin Lee Jacobs says
Hi Vicky – Fold the dough in thirds one time after the first rise. Enjoy the bread!
Vicky says
Thanks! I love your blog!
Heather says
Kevin do you by any chance have a wheat version of this recipe and/or a bread machine recipe? I did a little playing with the measurements to do the recipe in a bread machine (dough only) since I have so little time to stand and make the dough. Some days it’s the only way I can get homemade bread made. I think this would be heavenly in a cracked wheat. I’ll let you know how my experiment works. Thanks
Kevin Lee Jacobs says
Hi Heather – So far, I’ve used my covered bread pan only for Pain de Mie. Let me know how your wheat version works out!
pat/pasadena says
OMG. I’ve made a lot of different kinds of bread but this is over the top! It looks s-o-o-o-o beautiful and tastes even better. I think the butter is the secret, and, of course, the amazing pan. Whatever is the secret, I wil make this over and over. I’m preparing Croque Monsieur for a lunch and this bread will make the difference. Thanks.
Diane TG says
Kevin – one of my favorite parts of your wonderful blog is following the links and discovering a fabulous recipe (or gardening hint, or household hint – LOVE the glass cleaner!) that you posted a few years ago. This bread sounds delish — I’m off to Amazon now to order a pullman pan!
Linda says
Would putting raisins into the dough before forming it the final time be heretical?
Kevin Lee Jacobs says
Hi Linda — From what I recall, traditional raisin bread is made with Pain de Mie dough. But the bread is baked in standard loaf pans, instead of the covered gadget described above. If you have the time, let me know how the loaf works out for you, okay?
Linda says
Will do, starting first rise now.
Linda says
So I started the bread late, didn’t put the yeast in warm water, but gave it a couple of 5 second shots in the microwave (in water), after all the risings and shapings, I forgot to put the ()&$ raisins in. I think that I didn’t let it rise long enough, even with the electric blanket, because it didn’t reach the top of the pan after baking. Of course, that could be my oven, which seems to have a problem maintaining temperature and which one has to monitor constantly with two oven thermometers. So the crust is a bit, shall we say, “crunchy” but the bread is damn good. No sugar, however, which I realized in the middle of the night. So probably not a good bet for raisin bread without adding sugar. Might try that . . . your directions are fantastic, the photos, the details and the printable recipe are great even for someone whose made bread for eons. Thanks for the hard work you put into this.
Carol says
Hello Kevin,
Love your site. I would like to know if I can use bread flour for this recipe?
Thank you again.
Linda W says
Hi Kevin,
Have saved your Pullman bread recipe for until the day I find a Pullman tin. I live in Malaysia and Australia and I finally bought it in Hongkong yesterday!
I know your recipe calls for plain flour – plain unbleached? / plain superfine? What about bread flour?
Kevin Lee Jacobs says
Linda W – Use plain unbleached flour. It’s the equivalent of American “all-purpose” flour.
Carol – I suspect you could use bread flour for this recipe. I’ve only made Pain de Mie with all-purpose flour.
Linda W says
One more thing, Kevin, is the temperature for fan forced oven or just top and bottom heat?
Cheers,
Kevin Lee Jacobs says
Linda – I have an ordinary gas oven. The heat is emitted from the bottom.
Linda W says
Thanks, Kevin
Pat c says
Kevin , I have made the. Pullman bread 4 times. It is amazing. Today I made 2 loaves – 1/2 hour apart, because I have only 1
Pullman pan. The rising times were a little off. However, I forgot to let the first one rise in the pan and it doesn’t,t look like it’s supposed to. It didn’t entirely fill up the corners. In other words, it’s not perfectly square or rectangle. I haven’t cut it yet so I don’t know about the inside. I remembered on the second loaf. I’m sure that one will be perfect. One loaf is a gift. Everyone wants a loaf!! Guess who gets the imperfect one? That’ ok. Thank you so much. Next I’m doing naan.
Kevin Lee Jacobs says
Hi Pat — Kudos to you. And yes, pain de Mie makes a terrific gift (as does a Pullman pan)!
Laura says
Thank you for a wonderful recipe with clear instructions and great photos! And, no sugar, which makes me very happy.
I made this today to make “sandwiches de miga” for my Argentinean husband. The loaf turned out so beautifully and with a terrific crumb (no need for malt extract like I had seen in some of the recipes from Argentina).
By the way, I made this by hand, and it turned out great… I just imagined my hands like dough hooks when I was incorporating the butter. 🙂
My next goal is to try this out gluten-free. I’ll post how it turns out.
David says
Thank you for this recipe, which is my go-to version for this classic loaf. I wasn’t entirely successful at first; the bread itself turned out fine but I couldn’t get it to rise enough to fill up the pullman pan. But last night I tried it in the Zojirushi Virtuoso machine dough cycle. I simply put in all the ingredients at room temperature, without proofing the yeast or scalding the milk (I did include the 1/4 cup water that would have been used to proof the yeast). After the machine was finished I took the dough out, gave it a few kneads to smooth it out, then let it rise in the pullman pan and baked as instructed. This time my rise really worked well and the loaf came out perfectly.
Mary Shaw says
I have my very first Pullman loaf rising right now. So far so good! My question is, do you have a recipe for 100% whole wheat Pullman bread?
Mary Shaw says
Oh and yes, my newest glass measuring cup looks just like yours. Almost all of the red print has come off of it. My old Purex one still looks brand new. What’s up with that?!
Maria says
I happened across your site because my first attempt at pain de mie was a failure :\ Your wonderful article clears up why. I’m too embarrassed to tell you all of things I did wrong. Well, this was my first attempt at baking any kind of bread (that requires yeast) so the perfectionist in me (whose ego is bruised right now) has agreed to stop beating myself up ;o)
I have perused your website and wow — you are splendidly talented. Generous too — thanks for sharing w/us.
joanna says
Hi
I bought a Pullman tin yesterday. But it is a smaller one (9″x4″x4″). Any idea how to convert your recipe to fit? I am new to baking. Thanks!
Denise says
Thank you, Kevin
It really is the ‘simple things’ in this life. Walking into a house where bread is baking…..a little piece of Heaven! Denise
Pat Coulter says
Hi, I’ve made this bread following your directions several times and it turns out perfectly. My friends keep asking me make them a loaf. I just wish the rising times were a bit shorter. I feel like I have to stay home all day. But at the end of the day – it’s worth it. Thanks for the recipe.
Barbara Jean Smith says
A wonderful Recipe! I don’t (WON’T) have a dough mixer, but I will find out how to make it by hand!
A note: I don’t use Pyrex any more, because of the sell off “off shore” thing. I use Anchor Hocking. And the lettering doesn’t peel off! And it’s made in the ol’ USA! You got to try it!
Cathy says
About the measuring cups…I own 2, one is pyrex and the other is anchor hocking. The anchor paint is badly eroded…i basically only use it for a 2 cup measure, or for heating stuff in the micro. The other (older) cup is holding up fine to similar use.
Erin says
Kevin – I love this recipe and have a long list of requests for loaves. I’ve made it perfectly in the past but the last three loaves I’ve made have had a lot of trouble on the third rise. They just won’t rise to an inch within the top – even if left sitting for 1+ hour. And this last loaf I tried rose to within an inch of the top (as usual) but then did not rise to fill the pan in the oven and came out with rounded and uneven (and sad) top. Any ideas why I’m having such trouble? Thanks so much! I am a huge fan of the blog, your house, and lily!
Kevin Lee Jacobs says
Hi Erin – How odd that the bread worked out for you in the past, and now, suddenly, the dough won’t rise when in the pan. A couple of thoughts: 1) be sure to use “dry active,” not “rapid rise” yeast; and 2) let the dough rise only until tripled in volume during the 1st and 2nd rises. Otherwise, if the dough sits for too long, the yeast will slow down or become dormant. Wishing you the best for your next batch of pain de mie!
Gene says
Kevin,
This recipe is perfect, but I now what to move into whole wheat flours. How do you recommend I adjust your recipe for using 100% or close to 100% KA White Whole Wheat flour?
Thanks so much
gene
Kevin Lee Jacobs says
Hi Gene – Officially, Pain de Mie is a white bread. But you can swap 1/2 of the all-purpose (white) flour for whole wheat. Enjoy!
D. Patrick Adams says
Made this bread, in this pan today. Had much shorter proof times due to being in the warm south. It is perfect.
Jana says
Kevin,
Really like your new site. Layout and graphics are beautiful. The recipe portion appears in larger and fancier font on my ipad too which is great for following the step by step directions. I’m going to try a gf version and see what happens.
Congrats on the Italy layout.
Love,
Jana
Azure says
I know that I’m very late to the game on this recipe, but I just had to comment.
Oh. My. Goodness.
This loaf of bread was GLORIOUS. Crisp crust, pillowy interior, delicate crumb, and fabulous flavor. This is my new favorite bread, and I’ve made a LOT of bread!
The only tiny deviation that I made was to add a teaspoon of honey whilst proving my yeast, as it was not giving me much confidence in it’s livelihood. Thankfully, that wee bit of honey woke the yeast right up and allowed me to continue.
My husband, children, and I devoured half of the loaf as soon as it cooled enough o handle.
It was amazingly light and delicious. I can’t wait to toast it and turn it into sandwiches tomorrow!
Thank you so much for this fantastic recipe. It will serve my family well for many years to come.
Kevin Lee Jacobs says
Hi Azure — Thanks for the review. I’m so glad you enjoyed the bread!
Mary Ellen Chodur says
Hi, Kevin,
I’ve seen recipes for a Pain de Mie bread in the Pullman Pan and will break down today and order the pan. I have two questions for you – 1. Do you have any other recipes that use
this pan? 2. What is the purpose of scalding the milk?
Thanks. I love your website and look forward to reading your adventures.
ay says
Hi
would you please convert the recipe to gram? In here we rarely use cups & i already google metric conversion but every website have different conversion. Please help thankss
Fawn says
My third rise didn’t quite make it close to the top — even after giving it an extra 15 minutes — maybe my Pullman pan was slightly larger. But that was delicious. Thanks for the recipe
Michael says
I’ve making pain de mie in Pullman pans for years. In my house the complaint has been that my recipe has a tendency to be crumbly thus hard to create a sandwich with. I’ve been looking for a version that has slightly more stretch, more like conventional sandwich bread. Generally I use bread flour and get better results. Your recipe calls for milk and brutalized butter. It’s also definitely long-form. Raising and punching, etc., I don’t generally do. Maybe this is the solution I’ve been seeking. Making it tomorrow.