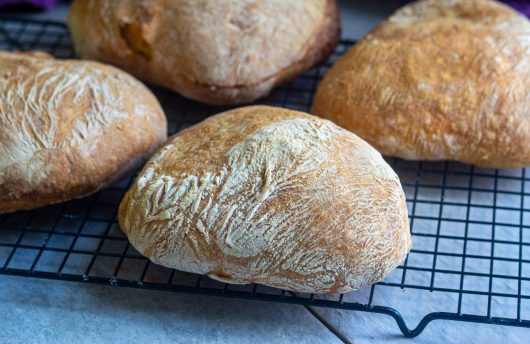
 If you only know the sad, commercially-produced Ciabatta that supermarkets sell, then I have wonderful news for you. Homemade Ciabatta is the real deal, as evidenced by its crackling-crisp crust, its yeasty perfume, and its soft, “open” crumb. You can make this bit of heaven entirely by hand, just as I do. Here’s how:
Before you proceed to the printable recipe, please watch the video above. I want you to get a “feel” for making Ciabatta, from mixing the “Biga” to kneading, forming, and baking the dough. A video is worth a million words, my friends.
What’s Ciabatta Bread?
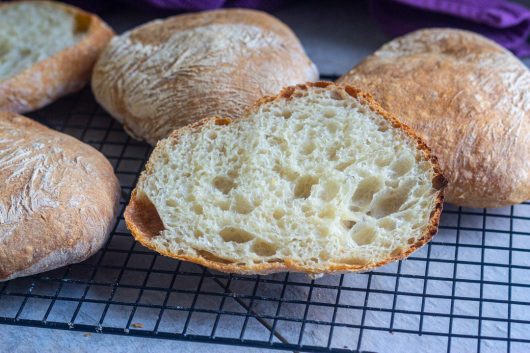
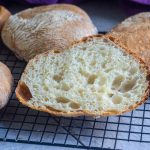
Ciabatta is a white bread made from wheat flour, water, yeast, and salt. The bread is known for the myriad air holes (properly called “alveoli”) in its interior. The dough from which the bread is made is much wetter than traditional Italian bread or French baguettes. It is a high-hydration dough.
History
According to Wikipedia, “Ciabatta bread was first produced in 1982 by Arnaldo Cavallari, who called the bread ciabatta polesana after Polesine, the area he lived in. The recipe was subsequently licensed by Cavallari’s company, Molini Adriesi, to bakers in 11 countries by 1999.” Cavallari and other bakers in Italy were concerned about the popularity of sandwiches made from baguettes imported from France, which were endangering their businesses, and so set about trying to create an Italian alternative with which to make sandwiches.
 Flour Notes for Homemade Ciabatta:
Use strong bread flour. I’ve tested this recipe with both all-purpose and bread flour. All-purpose flour (11.7% protein) produced a respectable loaf. Bread flour (12.7% protein) produced a superior loaf, with more air holes than its all-purpose kin. Remember — Ciabatta is only ciabatta if its interior is riddled with air holes!
Measure the flour by weight. Ciabatta is a high hydration dough, with a specific ratio of flour to water. To insure accuracy, measure the flour by weight, not by volume.
Here’s the printable recipe:
Homemade Ciabatta Bread
Ingredients
For the Biga:
- 250 grams bread flour (12.7% protein)
- 250 grams (1 cup) room-temperature water
- 2 grams (or a rounded 1/4 teaspoon) instant yeast
For the final dough:
- 250 grams bread flour
- 4 grams (or 1 teaspoon) instant yeast
- 8 grams (or 1 1/2 teaspoons) salt
- 125 grams (1/2 cup) room-temperature water
For greasing:
- 2-3 teaspoons olive oil
Instructions
Making the Biga (do this 6-24 hours ahead of time):
- In a large mixing bowl, stir together the Biga ingredients until smooth. Cover the bowl with cling film, and let rest at room temperature for 6-24 hours. After this time, the Biga should be puffy and bubbly. You will know it's alive!
Making the final dough:
- Pour the ingredients for the final dough on top of the Biga. Stir brusquely with a stout wooden spatula until combined.
Kneading the dough:
- Knead the wet, sticky dough for 8 minutes. To do this, use the spatula to roughly manipulate the dough, lifting it up and letting it fall back into the bowl, and/or by stirring, Feel free to take 30 second rests whenever your arm gets tired from manipulating the dough!
Resting the kneaded dough:
- Grease a large, clean mixing bowl with some of the olive oil. Transfer the kneaded dough to the oiled bowl. Cover with cling film and let rest for 30-45 minutes at room temperature. (Use the greater time if your kitchen is below 70°F.)
The first fold:
- Grease your hands with olive oil. Then slide your hands under one end of the dough. Stretch that end upwards, and then fold it over the top. Repeat this same procedure for other end of the dough, as well as the sides. You will have 4 folds in total. Cover the bowl and let rest for 30-45 minutes.
The second fold:
- Repeat as for the first fold. At this point, you will notice the dough has developed just a hint of structure. Cover and rest the dough for 30-45 minutes.
The third and final fold:
- Repeat as before. By now you will feel a definite change in the dough -- it will be less sticky, and more elastic.
Forming the loaves
- Generously flour your work surface. Also, line a baking sheet with parchment. Without deflating the dough, turn the bowl upside down on the floured surface, and let the dough naturally (and slowly) drop onto the flour. Generously flour the top of the dough. Use a floured bench scraper to gently form the dough into a square. Then use the scraper to cut the dough in half for 2 loaves. If desired, cut each half in half to create 4 loaves.
- Taking care not to deflate the dough, lift each loaf and place them, upside down, on the parchment-lined baking sheet. Cover with a tea towel and let rest until nearly doubled in volume -- 45-60 minutes.
- Meanwhile, adjust the oven rack to the upper third level. Preheat the oven to 450°F.
Baking the Ciabatta -- 30 minutes at 450°F
- Put the baking sheet in the preheated oven. Then quickly mist the loaves with water, and close the oven door. Mist the loaves 3 times during the first 5 minutes of baking, always quickly opening and closing the oven door. Bake until the bread is richly browned -- about 30 minutes. Cool completely on a wire rack.

Lee S. from NJ says
Thanks Kevin, Have tried and loved almost all of your bread recipes during this indoor time. Would it work if I put an oven proof dish filled with water on the bottom of my oven in stead of opening and spraying the loaves with water the first 5 minustes? Or does the spray have to come in contact with the loaves? Love how you present the recipe. It gives me time to take notes.
Pam says
Your tutorial is excellent – can’t wait to try this. Until our watched your video, I was intimidated by ciabatta bread. Your loaves looked perfect. Thanks!
Marcy MacDonald says
Takes a lot of time, but it looked delicious. Not sure about the grams for measurements.
Anne in Vermont says
Hi Kevin,
Could I interest you in perfecting a loaf of gluten free bread? I have one recipe that works fort me but would love tried and true choices. I have experimented some but the results have not been stellar. I are them, but I can’t say I was eating bread.
Thanks for considering this,
Anne
Cozette says
Looks yummy! Can’t wait to try it! Also, thank you for giving us a way to change amount of servings and weight in grams. It makes my life so much easier since I am cooking for one most of the time.
Steve says
I want to support Anne in Vermont regarding the GF need for good bread. So often it is simply something to hold sandwich fixings and not good itself.
I love to make your gf English Muffins.
Diane says
I’m wondering about freezing the Tuscan Bean Soup. If frozen do the beans get mushy? Obviously, I would not put in the Arugula until I was ready to heat and serve it. Also, if Iwas to make the Ciabatta bread at what point could I freeze the dough for future baking- or is it just as delicious if I baked, froze and then thawed for future eating? Could you reheat the bread and not loose the integrity of it?
Julia says
Please specify that for the biga you need 2 cups flour and only 1 cup water! I made the mistake of assuming 250 grams for each meant 2 cups for the flour and water. So I formed a soupy mess! I tried again but used half of the white bread flour and half of the whole wheat flour..it is time consuming but the result is SPLENDIFEROUS! I followed Kevin along every minute of the tutorial!! What a great tutorial. This id my first time trying Kevin’s recipes. i am hooked. ❤
Julia says
Hi Kevin it’s me again! I just made this recipe with 100% white bread flour (i use Bob’s Red Mill). the golden loaves look and smell fantastically! I let the biga rise for the full 24 hours. i have begun baking bread every Sunday, for Sacrament, for our entire congregation! Please keep the bread recipes coming! I’d love to see a Kings Hawaiian copycat, pumpernickel and a brown bread, really any bread i can get away with making for Sacrament! Thank you for this stupendous recipe! ❤
Faye says
Hi Kevin. I used two cups of flour and one cup of water. It seems like that’s too much flour when I look at your final biga.