Last updated on April 28th, 2019
 Do you have drip-irrigation installed on your property? If so, then I have some questions for you! First up, did you install the system yourself? And next; do the water lines require annual maintenance? Read on, and I’ll show you three of the gardens at Clover Hill where drippy-drip-drips are needed the most:
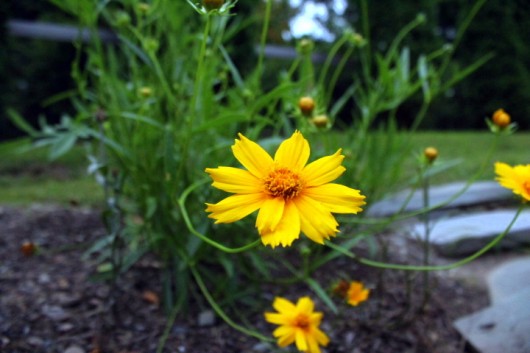
 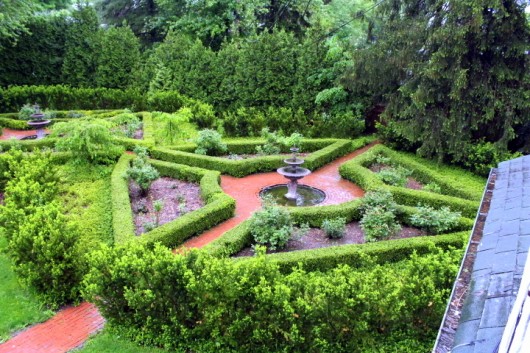 Boxwood Garden. Here, my only concern is the roses that grow inside boxwood-framed beds. Drip irrigation, targeted at each rose bush, seems the way to go. But how to install drip lines in the 8 beds that are separated by brick paths? Ah, that is the question.
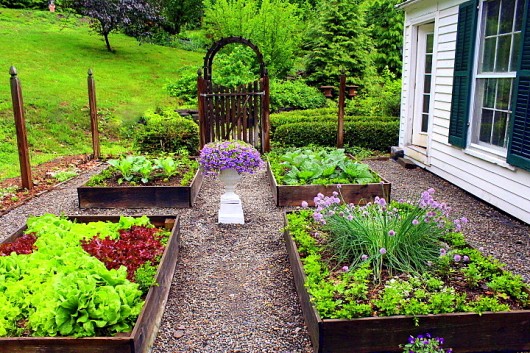 Herb Garden. Pin-pointed irrigation would be welcome in the 4 raised beds here. Not welcome? Black plastic tubes snaking between the beds. Can drip lines be installed in some…aesthetically-pleasing way?
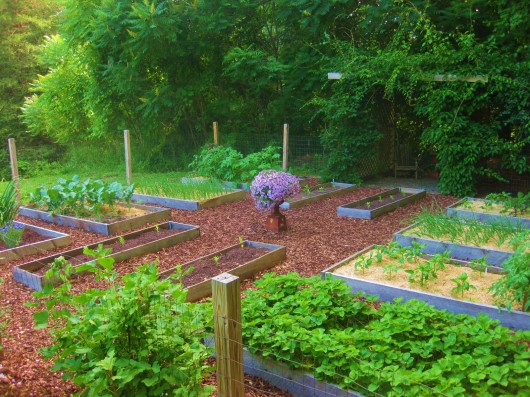 Kitchen Garden. This garden is equipped with 12 raised beds. Can I have dripping without the fear of…tripping?
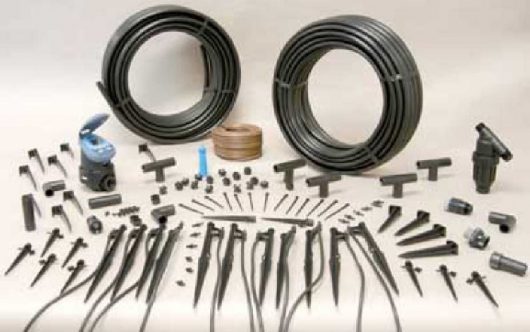 I watched a drip-irrigation video tutorial the other day. “Installation is easy!” claimed the perky-voiced narrator. Then she described, in mind-numbing detail, how to snip, twist, clip, and clamp what appeared to be 8 million tubes, rings, and threaded things. I nodded off for much of the video’s how-to segment. But I awoke in time to hear the narrator’s closing statement: “If you live in a region where winters are even moderate, then you will need to dismantle your system and store it in a dry location. This way, your drip irrigation will be ready for use when spring arrives.”
Oops. I live in a region where winters are SEVERE. Does this mean I’ll have to pull up bricks, etc. yet again before winter sets in? The very thought makes me shudder.
If you employ drip irrigation on your property, please let me know if you “undo” your work when summer is over. Also, just to recap, I’d love to know if you installed your drip system yourself, or if you hired out the job. I know that drip irrigation is great for both plants and the environment, but setting up such a system at Clover Hill seems rather…daunting.
A penny for your thoughts!
xKevin
You may also like:


Cary says
Call the Guy
Rosemary says
Great questions, I am anxious to hear what people have to say. I would like a “drip irrigation” for my window boxes and hanging baskets. Any ideas on this would be great. I have window boxes on the house and the deck. Thanks
CarolineR says
I want to know how too. I need to set it up in my raised beds in my vegetable garden….
Christy says
You can do this! I was intimidated as well for this dyi project. But in the end we bought the supplies and installed it ourselves and it was much simpler than we feared. I also did a little moving around of plants after the fact, moving the drip line to accommodate was simple. You can burry the line underground btwn the beds and under the brick path. No need to pick it up over the winter- just blow the lines out in late fall. Easy peasy! There are also option to add fountain sprinklers or misters in places. Your going to love having it when it’s in!
Also I looove your boxwood garden. I adore all of your gardens really! We planted 70 boxwoods in the font yard 2 summer ago and i am contimplating your propagation method of snipping new growth and planing directly in the ground this spring. I would like to create another garden in a full sun spot and boxwood border in a shady spot. Any other tips, dos or don’ts to share? It’s hard to believe it could really be that simple!
Gretchen says
Hi Kevin, I have a garden design business in Montana and I must admit that due to all of the work I have gardening ~~ I leave those drip systems to my clients who are up for the task or give them a referral. To truly do the system correctly and not have it annoy you or miss plants, I think calling an expert is the best thing to do~! Just one other thing, I use alot of ground covers in my gardens to keep the weeds down, the soil moist and because I love them and I am totally organic. I always suggest having risers extended above out of the lines to spray the ground covers like little sprinklers. Montana is like Siberia most winters and I don’t think people put them all away; they just turn the system off. I hope this helps … your gardens are amazing!
Betty says
Both my son and daughter have it, both “professionally “ installed (one in raised beds (Colorado)the other in regular beds (Minnesota)). Not impressed with either. Some areas stayed dry and plants died; other areas too wet. Over a short time the “buried” tubing heaved to above ground in places. I would much rather control what, when, how much, etc.
Amy says
I use drip irrigation in my raised vegetable garden. I bought mine at agway. I use regular green garden hose between beds- I just bury them in my mulched walkways-I do disassemble them every winter bc in my zone 5 the lines would freeze and split. It’s quick and easy after the first year of cutting lengths and adding splitters. I find it’s easier this way because then I can turn beds without worrying about hitting lines. There is a spigot at the corner of my garden to control the water with a line running back to the house spigot. The main water line back to the house is buried underground and we just blow that out with an air compressor and leave it year round. My biggest problem was that the “drip” is stronger closer to the water main and much slower close to the end so I split my garden into two sections and just added a splitter at the main shut off for the water so now I water each half on opposite days. I have ten raised beds that vary from 8’ square to 3’ x 12’ . The overall fenced area they are in is 25 x 50’ including walkways and a small greenhouse just to give you an idea of what I’m working with! Hope this helps!
Sheri Wentland says
Well, when I lived in Arizona I had everything on drip and it was easy to install, maintain and use. I left it out year-round. But now I’m back in north Idaho where we appear to have six months of winter. I, too, would like to know if I can do drip irrigation here. Vague memories from my childhood say it does have to be dismantled every winter or, at the very least, blown out.
Donna Frost says
I may have one suggestion for you. We are in NH. The driveway is almost next to the house and we have a section of lawn before you get to the vegetable beds. I was forever dragging hoses and having them across the driveway was bad. My husband installed a dry hydrant which people use in barns to provide water for livestock. The waterline is buried. When you lift the pump handle the water comes up to the faucet. When the handle is dropped, the water drops to a level below freezing. I have it in my high tunnel and in the summer we link it to a stand that includes the hose reel. This doesn’t answer any questions about drip irrigation but perhaps some of your beds could be targets for drip irrigation while others such as the knot garden stay on sprinklers.
Linda says
Don’t know if you have ever seen “Garden Answer” on youtube. This young couple gardens a few acres in Eastern Oregon and she (Laura) is always demonstrating her drip system, most of which she seems to install herself. You may want to check it out. Good luck.
Nancy says
To answer your first question, in the fall you hire a professional to come and pressure blow out your system so there is no water left to freeze and burst your pipes (less than $100 unless you have a lot of zones in your system). We are in garden zone 7 not much above NYC. We have had drip irrigation for years as an add-on to a sprinkler system and it is a godsend. When we were pretty young, some 30-40 years ago, we installed an underground sprinkler system ourselves, consisting of rotor sprayers that covered everything. (Rented a trencher and did it ourselves.) The only professional we used was to pressure blow it out each fall. Come spring, we turn it back on (ourselves), test everything and repair any issues ourselves. Years later as systems became more sophisticated we converted the rotors covering beds and shrubs to sprays on posts. Although easy dyi also, we were busy and could afford to hire a professional so did (less expensive than you might expect). Again maintaining ourselves except for the fall blowout. Then as drip came into the picture (maybe 10 or so years ago), we again hired a professional to convert the sprays for the shrubs and beds into drips. (It’s not as expensive as you think it might be – try an individual, good local landscape gardener, and compare pricing with a big company that specializes).
We learned from doing it ourselves that any kind of system is easy to understand and easy as d-i-y although sometimes a bit time-consuming. If you understand what you need to do, you can hire a strong young person to do the digging. All the different pieces available do seem daunting but aren’t really. Plan on paper just as you would a new garden. Once you get the main tubing in place underground, it’s very easy to add on – for example, individual tubing for pots coming from the main tubing. Less complicated are systems that use hoses to connect from the water source to the beds – in that case you might have to bring those in in the winter. Also much of our drip tubing, particularly in our vegetable gardens that we may plant a little differently each year, sits either on top of the ground or just under a layer of mulch. Easy to reconfigure if necessary each year. You might want to do one or two raised beds the first year using a “hose” system to see how and what you like, what works for you and what doesn’t. (You would need to bring in the main hose for the winter and have the other tubing blown out.) If you REALLY like it, have a professional set it up the following year with the main tubing underneath the bricks at a later date. Also, a final note, if you install a fully automated system with controller, etc., some communities require a permit/inspection (ours did) of the backflow device to protect the local water. But because of your location and water source, that may not be required for you. Also, check out sprinkler warehouse, an online store – they are very helpful (also reasonable prices) if you call them and tell them what you are trying to do.
Janis says
Hi Kevin, we have a drip system at our home n Northern California where water is the most precious commodity. The system was suggested and installed by our landscaper many years ago. Since we do not yet permanently reside in the home (it is now used as a vacation home) we needed to be assured the xeriscape landscaping would receive regular watering within the codes for our county. The landscaper installed it and threaded everything under ground. No unsightly lines anywhere. T
here is a timer attached (screws on) to the hose bib and the hose attaches to the timer; the hose feeds the water supply to the lines in the drip system.
In the fall before we get any freezes but after the mild weather is over, I detach the timer, wipe it clean from any accumulated lime or dirt and slip it into a freezer-style zip lock bag. Then I place it in a hose storage container for the winter. The landscaper comes out and blows the water lines. In the Spring after the rainy season passes (if we even get one) the landscaper retrieves the timer and hooks everything back up for the warm months. We have been very happy with the system. It is not a difficult system to install or maintain according to our landscaper. Hope you have the same success with your system.
Rebecca Rosenblum says
thank you so much for asking this question! I’m very interested in people’s answers… years ago I purchased a system and installed it and it was a complete waste of money – didn’t work from the get go, because the connections all leaked… also you need to understand how much pressure you need for each section and i’m not sure how to figure that out…
Garden Maven says
Kev, my husband installed a drip system covering all flower beds (2acres) by a combination of delivery hoses (to automatic Gilmour timers) which in turn, via drip hoses (Wally World, Home Depot, Lowes) deliver water to all sections of the flower beds. We live in a 1747 farm house in the Hudson Valley with water supplied by our well. In order not to run the well dry each timer goes on staggered. One goes off the next goes on etc. etc. it works superbly well (10 years+) (I can send you some pics if you tell me how). We remove the timers each fall but leave all hoses in place. The only problem with this plan is the drip hoses only last a year or two and have to be replaced because the holes get bigger, thus more water distributed and our well can’t take that additional pull. The drip hoses aren’t expensive and so consider it a cost of doing business!. If your water has great psi this is a great, inexpensive way to go. If you have a well you just need to monitor the psi more closely. Hope this helps!
CindyG says
I have successfully / easily used the drip irrigation system from Johnny’s Seeds for a number of years. My vegetable garden consists of 21 deep dug beds with mulched paths between them. Feeder lines are in place year round, running under my mulch – most of which is pine needles over commercial weight fabric. With some measuring and sketching and careful counting of necessary connections, the creation of this was fairly simple. Each spring prior to any planting I check for necessary replacement or repair of drip lines. With the occasional exception – and if I have been careful with the tines from various tools – the drip lines last for 3 to 5 years before I replace them. I also use Johnny’s EZ-Flow Fertilizer Injector as it controls the pressure of the water flowing into my system. I am a bit north of you, in Saratoga County. At the moment, with the exception of the injector tub, my entire system is happily snoozing under a thick blanket of snow. Ive ordered my plants, seeds are arriving daily, and with any luck I’ll be back in the gardening business in no time. Best of luck with this project-
Tiffany George says
Kevin! Not gonna lie, when I was considering doing the same thing to my yard I was crippled by the anxiety and put it off for a couple of seasons. That said, when I finally did some research and designed a plan it was much easier than I had built it up to be.
There is a product (pipe) called Netafim which has pre-drilled holes and a one-way valve so tiny critters cannot climb in and stuff the whole show. Hence, in answer to your question “do I pull it up in winter”? The answer is a resounding NOPE. I live in SLC, UT and we are currently under a frozen blanket of snow that has been here since December. Our winters are harsh and cold and the only repairs I make are when my friends and family drive over them with something. You’ll need a trenching shovel, several rolls of Netafim, and connectors. And I’ve found that flirting with the guy at sprinkler supply place gets you personal assistance, (he pulled all the parts for me and even tweaked my designs) . I put them together before my plants can up then trenched the connecting lines under my paths. For my perennial garden I did the main line first then used a rectangular pattern to hit all the plants. I closed the system so it just recirculates water to itself but left an easy open end so I can flush it in the spring. Don’t worry. It’s easier than you think. If you need to you can email or call me.
Sandra says
Hi Kevin
I love your recipes and I am a regular viewer of your videos. They look delicious and are easy to make. I’ll definitely try the chickpea fritters!
Thanks for the recipe videos!
Now to answer your questions:
Of course I have drip irrigation; I live in Israel and there is hardly a drop of water between March and October.
The system was installed by our gardener. It comprises a controller installed under the porch roof (out of the rain), and two lines, activated separately – one for programming the grass sprinklers and one for the roses and and the hedges (through “holey” pipes). We installed this system several years ago and it still works just fine. I turn it on in the spring (at the controller), and turn it off when it starts raining, some time in October. The only problem I have had so far was an occasional leaky pipe, which can be easily reconnected using plastic connectors.
Since the installation involves connecting the controller to electricity, we thought it best to let a professional do it.
That’s about it!
Good luck with your system,
Best regards,
Sandra
Edie says
We also use drip irrigation in our two 25′ raised vegetable beds, zone 6B. We installed ourselves. Since ours is away from the house, we installed underground plastic pipe which rises out of the ground at each bed with a valve. The above ground drip tubing attaches at only two points and is removed in the Fall and stored overhead inside. Ours is a simple configuration with no hoses in the paths. We do have a length of hose at the house spigot with another multiple valve. We have the most trouble with glued joints at the garden valves but no issues with the drip tubing (about 150′) …using for six years….can be put on a timer too! It is all so lightweight and really not that much effort to install and remove once each year. Lots of tougher versions that would remain year round for shrubs and gardens that do not need be regularly disturbed. Herbs need so little water that I have not considered drippers even during very hot summer weather, lettuces grow in wetter seasons. One last thought…mulch hides the drip hoses (if you don’t want them seen) and protects them from the sun. I would think you could go underground at all your paths but more joints mean more points for possible leaks and more places to cap off in winter!
Marina says
I highly recommend “Drip Depot” on line.
They are professional greenhouse and growers suppliers who are kind enough to also sell to home owners.
I know from following your blog for years now,that you are handy and undaunted.
You can do this!
I like the suggestion of one lady, start a little at a time or hire someone to do it al at once.
The advantage to doing it yourself is that you will have no problem maintaining it yourself.
Drip depot sells a starter kit, a great tool box, and you can start with just the drip lines in your raised herb and lettuce beds.
I have 11 beds in my garden, and I do rotation planting, and I can change the lines according to the rotationm .
Each bed has its own line, some drip, some over head for tiny seedlings.
If you tell me how to email you photos, I will be glad to do so and explain so more.
Marcia Chambers says
I had a local company called Instant Rain install my system and I just love it. I hear stories at the Master Gardener meetings of people getting off from work and dragging hoses around the yard for hours. Not me. There is a “brain” with 5 zones. Each zone can be programmed differently. I just sit in the house on a hot day hit those buttons. It can be set up for automatic each day, or can be over ridden if you think it is getting too hot or too dry. There is also a fertilizer injection system and the add on feature of rain cancellation. If the rain sensor is wet when the system is scheduled to kick on, then it will skip it for the day.
Everything is buried between the beds. There are two different methods of water delivery, some are sprayers and some are drip hoses. The sprayers are adjustable on the spray head itself. If you want more water to the dahlias, then run that zone for extra time and all that can be programmed into the brain. My favorite part is the upstairs window boxes that are on the window box and fairy garden zone. There are little clear tubes that hide in the siding. The window boxes are from Gardener’s Supply and have a reservoir in the bottom and an access tube. I just drilled a hole in the lid of the tube and stuck the tube in the hole. The window boxes are going on their 5th year.
The service man has a huge air compressor that blows the system dry each fall. The only breakage I get is my fault, digging up something in a bed with a shovel and I cut a line, but it is easily repaired.
Get a professional to put it in, pays in the long run.
Marcia
Elaine says
Good sun shine filled morning! In the front yard in town we ran a drip system to non established bushes or trees. In the backyard I only used it to water my wild flower garden area. In these cases, both were run off an existing “sprinkler” system. And heck no, I didn’t pull it up in the fall – just let the snow pile on it and hoped the deer wouldn’t eat all of the little spray heads.
Now living out in the forest I only use drip irragation for the greenhouse. It is run from the hose faucet to the greenhouse, then the tubing is run where needed. It’s been that way for 5 years, and no, do not pull it up either.
In your case, I would kind of do the same thing. Run the black tubing for underground sprinkler systems above ground along your beds, attaching them with clamps. Then branch off at each box, run your smaller tubing as needed. It’s time consuming, but works just fine. That way you won’t have to pry up your gorgeous walk ways. Also, if you decide you do not like watering with a drip system, it is “removable”. Then if you decide you love watering with a drip system, you could go ahead and put it underground fairly easy. I hook mine to the hose faucet so I can drain it in the fall. And I can’t find any one willing to bury it for me – Too small of a project
Best of luck with it!
Ursula Owens says
I have a raised bed vegetable and cutting garden with over 25 beds in zone 4B and have had drip irrigation for 8 years. I leave everything in during the winter except the filters and timers. I purchased the system from Drip Depot (one of my favorite garden related companies hands down). Their tutorials are great. Once I got started and made a plan it was very easy to install. I change things up every year if I need to (more drip lines, less, etc.) and can easily replace parts. Any damage that has occurred was inflicted by myself with clippers. I have had absolutely no problem with freezing…the tubing does not split. I also use it for containers and flower gardens around my house and shed. I can leave for 2 weeks in the summer with no concerns of plants dying. The tubing in the raised bed garden is hidden by pea gravel. I will never go back to any other kind of irrigation. I love it!
Elaine R says
We have a combination of underground drip and spray in some areas with a multi timer as we are on a well and in a very dry area. I also have drip lines in the veggie beds on tap timers that I take in yearly…with simple drip/sprinkler hoses and weeping hoses. I leave the hoses in place and take in the tap timers. Hubby has a compresser and blows out the lines in October. That has been in place for about 20 yrs and occasionally needs a new sptinkler head due to hard water and or deer damage, mostly the surface ones as opposed to the pop up sprinklers. Incidentally, we do all the overhead sprinkling at night. Daytime humidity seldom rises above the teens. We are north of Idaho in B.C. Z.3-5 with -20C and colder frequently with and without snow cover.
Janice Seigler says
Kevin, Hoss Tools is where I get my drip irrigation and install it myself. It has been a life saver for growing the best garden. It is very easy. https://www.youtube.com/watch?v=PGw_ISj3xhI
Bill Hart says
Hi Kevin,
Have you thought about soaker hoses? I’ve used them a bit and next year will be expanding their use in both veggie and flower beds. Not sure about leaving them in over the winter, although because they self drain, and because some instructions suggest burying them under a little soil, I would think they wouldn’t be harmed by frost. However, I’m not sure how well they would hold up to soil bacteria, etc. There are several types of kits for soaker hoses out there, miracle gro being the one I’ve used here in Canada. You can cut the hose to the length(s) you want.
Dr. LINDA LIGHTFOOT says
Hi, Kevin.
If you’re looking for aesthetics as well as a watering system, raised beds are really tough. I have a 2500 square foot garden, but it is in the ground, so I use soaker hoses and they work really well, but would not look so hot in your gorgeous formal garden. You may just have to bite the bullet and hand-water if you don’t want your garden to be overrun with hoses/drippers. I realize that you can bury the lines, but you’ll have to dig them up for the winter and start all over again in the spring. You can always save yourself some money and aggravation and just get one of those cheapo lawn sprinklers that arcs back and forth. If you water early in the morning, there will be ample time for evaporation from the leaves, so you won’t wind up with mildew, etc. It’s also easily moveable from area to area and can be stored without a problem when you are finished watering each day. The arc of the spray also covers a surprisingly large area. I use one on my veggie garden–have it on a timer, so no overwatering.
carla murphy says
Drip irrigation is super simple…if you’ve chosen the right system. Some are easier to put together than others. We installed all our own drip. Go with ‘in-line’ emitters. They don’t pop off the main line (they are already cut into the main line). Go with the screw together system, may be a bit more expensive (although I don’t know for sure) than the push together kind but they won’t pop apart. I’m in CA so I can’t speak for freezes, but I would imagine if your plant roots are not freezing under the ground, then your drip line (solid, no emitters), buried just below soil level, won’t freeze either. You can always put a ‘figure 8’ end cap on each emitter line so it is easy to open up the system to allow water to drain out before the freeze season. Looks like your brick pathways are set in sand? Pull up some brick and bury your drip line (solid, no emitters), replace bricks. You could even slide the drip line through some pvc under the pathways if you are concerned about the weight of walking on the brick.
Renovation is challenging in a different way than new builds…We installed the irrigation system before we installed our raised beds…pvc under ground to each bed location with risers in each bed with an on/off valve on each bed so we can choose which ones need to be watered. Drip line off the riser valve. But it looks like you can dig some trenches (they don’t have to be too deep…depending on how deep your soil freezes in your severe winter), between your herb and kitchen beds, bury some pvc, drill a hole straight down through the inside of your bed corner for a riser in each bed. 300ft maximum on one run of drip tubing (but I wouldn’t really trust that much, keep it no longer than 200ft). It would be a bit of work, but once its done, its done.
We are not landscape professionals, just homeowners who knew if the plants counted on me to keep them alive for their water, all our plants would die. So we needed automated watering. Watched some videos, helped with community installations to learn from those who know what their doing.
Are you going to be on a manifold timer system or hooking up to hose bib? Sorry, I can’t supply a brand name for the irrigation screw together connectors. We purchase from our local ‘fruit growers’ irrigation supply company and they don’t have an online presence. There is no brand name printed on the fittings I have. If I visit them soon, I’ll get a name for you.
And…thank you for your winter sowing tutorials. I have stuff coming up already. Spinach! I’ve never been able to get spinach to come up from seed in my beds. And most of what I put in the beds that does come up, gets munched down just as quick. Figured I’d try to get some plants established from seed and then move them into the beds.
Rob McWilliam says
I have three raised beds, end to end lengthwise, with a couple feet gap between them. I drilled holes in the top boards and put in short lengths of steel pipe, and then ran the perforated hose through the pipes, so as not to waste water [anything dripping inside the pipes runs back into the beds.] In the beds themselves, I just wove the hose back and forth to get as good a coverage as possible. The whole hose system is hooked up to a 1000-litre cube [on a stand to put it slightly higher than the entrance hole] with a short chunk of regular, non-perforated hose. When the cube is full of rainwater [hooked directly to my eavestrough], gravity and the water head will drain nearly the whole cube. Works great. I left everything in place over the winter [last summer was the first one.].
carla murphy says
PS… I would not recommend soaker hose for a permanent water source. Doesn’t hold up in the long run in our CA sun. I imagine freezes would be just has hard on it.
Anne in Vermont z4/5 says
Hi Kevin,
Unless the water for your garden is quite soft I would caution against this despite the labor it seems to save. I have tried soaker hoses in the past and they work just fine for about one year. After that only about one inch on each side of the hose gets wet. The following year, virtually nothing owing to the holes becoming clogged with mineral deposits. I can’t see that a system made with other materials would have holes that would not clog from minerals.
At my current house I am constantly digging up lengths of either soaker hose or drip systems installed in the past. Given how hard the water is here (and that the plants would not like the softened water we use in the house) I am not surprised that these were abandoned by past owners.
In northern Illinois it seemed wise to take up the hoses for winter, but then they are filthy, don’t coil easily and are a total pain to put down again around plants because they do not lie flat unless the same curve is discovered.
Save your time and money and the massive amount of frustration I expect you would experience after the first year or too.
Judy Hines says
We buried those black hoses with pin-like holes and snaked them around the tomatoes and it worked for the first year but we did pull up the hoses and sent water running thru to flush out any soil. The second year we did the same, but there were many puddles, i.e, the watering was uneven. We decided this was too labor intensive even tho we were much younger.
Roberta says
I use the snip and drip system from Gardener Supply (https://www.gardeners.com/search?q=drip+irrigation&simplesearch=submit). The system uses flat soaker hose with regular garden hose connectors. Real simple to put in. At the end of the system, just flush out the hoses and roll them up. They even have a design for raised beds and planters.
Denise says
I do not have a drip system, but I addressed this subject with my irrigation company several years ago and was told that for my situation that I did NOT want a drip irrigation system. Your gardens are laid out differently than mine. I do not have raised beds. I move my plants and shrubs from time to time. The expert told me that I would have nothing but problems. I had hoped that I could put an underground drip system in for my lawn, but he told me that aerating would nick the lines. If you can figure out how to hide the tubing and how to go from bed to bed, you may have a winner. Good luck.
Millielou says
I will second Laura from Garden Answer. She installs drip irrigation all over her 2 acre property. She and her husband live in eastern Oregon and have cold winters and not much rain in the summer. I believe she does not pull it up in the winter. I think you would enjoy her videos. She can do almost anything!
Sarah says
I have drip systems in all my gardens, but I use the KISS system. Gardener Supply has a system I’ve used with great success. Now I just make my own. Once you try theirs you’ll get the drift. Basically it’s buried soaker hose with solid hose connectors. I bury the whole thing and the hoses last, here in Michigan, for 5+ years. I cut soaker hose to fit my garden snaking them around so they are about 12 inches apart and connect the beds under the mulch with solid hose attach a timer and voila. Works a charm. I would suggest you start with a kit from Gardner’s Supply..
Maggie Smith says
Yes. My husband and I installed the irrigation system ourselves. Yes . We take up the boxes in the fall. Let them dry out and hang them up in the garden shed. There is no maintenance other than that.I have several box gardens but don’t use the boxes on them. Since my flower gardens are on two sides of the driveway, there is a plain hose linking the two different kinds. Gray boxes are almost invisible and you can drive right over the. The hoses are easy to snake around each individual plant if you like or put them in a line behind a row of lilies. See even have a timer on the boxes set up from the start up system hides and have three lines. Might sound tough but we live in the middle of the woods in Maine and we have very rough dirt. Got the whole system from wonderful Gardeners Supply catalog. Their people are great help in the phone , if you need a length of hose replacement , for example. Give it a try somewhere in your yard.
Tracy says
Kevin, head over to Lee Reich’s website. He’s been doing drip irrigated gardens, from veg to flowers, since forever. (Also published many books on horticulture). He gives classes/workshops on drip irrigation but gives all his expertise away on his site. Just do exactly what he says, lol, as he has mastered exactly what types of heads to use and explains why, and will coach you through using conduit pipe to go under your paths. (It’s stupid simple to do, you just hammer the pipe —Open end taped over— under your pathways with a rubber mallet and feed the tubing through the conduit. Lee prefers simple, not expensive and practical. Visit his site. He’ll hook you right up!
pk says
I live in the mountains in Montana. We put in our own drip line irrigation in our raised bed gardens. We remove the timer so it does not freeze in winter, but leave the lines in place. …the same with the lines that go to the flower pots on the deck. Both are connected to frost free hydrants.
As to the underground irrigation system for the yard — be sure to blow it out every fall before it freezes!
After being overwhelmed with all the bits and pieces for drip irrigation, lay them out and start making connections. It becomes easier after that first connection!
Margo P says
Kevin- I have used this system for years. DO NOT put underground. I did that the first time and when the main lines eventually ruptured underground it was a mess. Now I lay them on the surface for the eventual leaks. A great way to time water your garden beds. The timers are expensive ($30+) and eventually fail for diff. reasons. I have 11 timers and replace a couple a year. The timers are wonderful to use tho you need to keep a close eye on your lines for leaks, blown off sprayer heads, etc. I live in Fla but wonder if “blowing out the lines with compressed air would do the job.
Taking it inside for winter would be a monumental job causing more problems in spring when trying to re-lay. Hope this helps. And yes, you can do this ! Easy peasy!
Maggie Smith says
Please re-read my quickly written post. I MEANT to write hoses and I really meant HOSES , not boxes. Bottom line is that you can experiment on a small area then take it from there. Who says there is no excitement I gardening ?
Cookbook Collector says
Are you really ready for a financial commitment to a drip watering system???? Really???? Whether you DIY or hire a professional for the initial installation, there is then the maintenance issues that must continuously be addressed, year after year. My friend has professional on call service several times during the growing season to fix dried up emitters and balance psi in her system and then blow the lines for winter… it is a continuous reliance on hired help, i.e., money. The more systems, the more maintenance, the more money. Is it really worth it or will the basic soaker hose replacement every 2-3 years be satisfactory? Your choice.
mlaiuppa says
1. Yes, I installed it myself.
2. You should do periodic checkups to make sure drip heads, etc. aren’t clogged and are working properly. Occasionally I will clear out the line by removing the plug at the end and running the water through. I’d say once a year should suffice but always be sure to go out and check the line when it’s on every once in a while to make sure you don’t have a leak or a plant isn’t dying from a plugged up drip head.
3. You install the lines in each of the rose beds the same as you would if you were running pipe under a walkway. I did this in several areas. I got a length of PVC longer than the width of the walkway, put a hose adaptor on one end and then attached my hose. Then I turned on the hose bib full blast and used the water to drive a hole under the walkway. Then I put a length of PVC under the sidewalk in the hole I just made and ran my drip irrigation line through the PVC. I would actually do four beds together on one line with a timer, then have a separate line and timer for the other bed.
4. You can bury the lines under those gravel pathways and then have the line come up in the bed and then go from there. But I would find a corner of each bed where it isn’t that obvious and put in a timer running from a PVC line I would run under all of the pathways and then run the drip from the timer. That way each bed can be on a different time and you can adjust the frequency and duration depending on what is growing in each bed. If a bed is resting, you can shut the water off. (Always install a shut off on the PVC before the timer.) Timers that are battery operated are easy to install, program and replace if necessary. While I get the desire to hide everything, sometimes it is more practical to nod to maintenance and possible future repairs.
5. Again for the Kitchen garden there is no reason you can’t bury the lines. They don’t even need to emerge in the bed if you use a small length of quarter inch for the drippers and attach that to the main line. The main line can remain buried out of site. If you’re using a line of quarter inch drip, than the line can snake through but must remain on the surface. But the one inch it’s feeding from can be buried. Again, I would lay PVC under all of those pathways and bury it, then put on an adaptor and attached the irrigation line, which can be buried after you place all of your drip line.
6. I have never dismantled and stored my system in the 20 years since I installed it. We don’t get harsh winters here and only the rare frost warning. My line is mostly buried so I don’t worry about UV damage either. I just turn the timers off for the winter as we get plenty of rain in the winter and spring to keep everything alive. I only have to water in Summer and Autumn.
If you are handy, you can do this. Just plan things out on paper with the lines, couples, and keep track of tees, elbows, adaptors and whether you’re using drip emitters or drip line or micro sprinklers or what. Planning it all on paper from your water source down the line to the plant will help whether you do it yourself or decide to hire someone to do it. Just keep in mind that if you do hire it out, don’t be bullied into allowing them to install a system you don’t want just because it’s easier for them. It’s your yard and your water bill. I usually do work myself because that is the only way I can be sure it’s done exactly the way I want it.
Your mileage may vary.
Vicki says
Hi Kevin. I learned a lot here today! We have containers on a drip system and my plants do exceptionally well! The rest of the yard is on a professionally installed sprinkler system which, as you probably know, can be hit or miss on some areas. The only thing I have to add to all the great advice above is that about two years ago I found some clear plastic tubing that is still working today. I don’t think it was actually for this purpose but has worked for me! Think I purchased it on Amazon.
Julie Culshaw says
https://www.susansinthegarden.com/2019/02/feb-24-column-season-introduction/
She lives in Spokane,WA and deals with snow, she has drip irrigation to 25 raised beds.
Debbie - MountainMama says
Wow, your gardens are incredible!!!!! I’m green with envy!! 🙂
My sweetie has a drip irrigation system in his garden that he had installed by a plumber. The lines have to be blown out each fall and unhooked from the water source.
In my veggie garden I have a simple drip system that consists of flat hoses that snake through the plants, attach to each other, and are attached to a garden hose. I have to remove the hoses at the end of the season and reinstall in spring, but it’s a small garden so it’s not a big deal.
I think with the size of your gardens you really need to call a pro!
Susan Iseman says
Don’t know if you’ll see this, but we have a “Rain Machine” that programs our irrigation system. Not the greatest for some flower gardens to be watered this way, I know, but this system keeps track of the weather and only goes off in the wee small hours. It monitors moisture so it doesn’t water needlessly. Drives me nuts when I see irrigation systems running while it’s raining!
Kevin Lee Jacobs says
Hi Susan – I read EVERY comment that appears on this website!
Dale Korba says
I live in Colorado where water conservation is a must ( or should be.) I agree with the underground system getting a blow out every fall and hanging up the hoses, droppers and sprayers to drain and store in the winter. If you are methodical you can mark everything to put it back the next season. However, I think professional help setting it up is a good idea and prevents those return trips to the garden supply center!
Go for it! Save some water!!
Belinda says
Hi Kevin,
Wow! You have so many thorough answers, that I finally had to stop reading. We could not have done without drip-irrigation on our place when we lived in CA. We went under concrete and cobblestone walks with a tool that looked like a pipe threaded to connect to a hose.. I’m not sure where my husband found it. He hooked it to the hose and used water pressure to create a path for the black 1/2 diameter drip hoses to run beneath the walk-ways. Although we didn’t have to do it, I think the system could be blown out annually, as others have stated above.
Now that you have asked the question and received so many thorough answers, I may reconsider applying drip to my raised bed garden in NY. Thank you for this post. There’s always so much to be learned here.
Charlotte says
I had drip irrigation installed professionally when I had a sprinkler system installed in Kansas City. What a total waste of money. The drip system, if covered with mulch, will wet the soil and clog the holes. By the time you realize it is not working 24 roses are dead! My daughter had drip installed. If she left the dark brown hoses coiled above ground-it worked (better than nothing) but if she tried a little mulch—dead plants. The idea seems worthy, however the reality is a waste of money and a terrible aggravation. Run!
Louise says
Hey, Kevin! Love the website, except that it makes me feel totally inadequate.
I live in your neck of the woods, and we installed a drip system around five years ago.
Two thing: Yup, you have to bury it. We redid our garden so started from scratch, and we dug about an 8 inch trench to the corners of each raised bed. It’ll be hard, I know to remove bricks, but it’s the only way I know of of hiding the hose.
Second: I was mildly horrified to note how many people blow their lines out during the winter…only because I’ve never done it, which is now making me feel guilty. But we’ve never had a problem. The lines just sit there all winter and then seem to start up fine in the spring. On the other hand, the lines in the beds that feed individual plants get taken up and put into a garden shed. They get sort of messy and need to be reset depending upon the crop in that bed the next season.
By the way…one thing I did find is that the above ground lines that are sold and look like hose simply can’t be well-positioned in my beds without them kind of snarling. I’ve been using flat soaker hose, which is easier to position under stakes, at least for me. If any of your readers have another suggestion, I’d love to hear it!
Juls Owings says
Okay, I admit I called a buddy whose wife’s gardens are pretty close to yours. He did it himself but would advise getting a professional. He would NOT do drip with hoses as you can trip, they look ugly and have to be CLEANED yearly. He put in a sprinkler system , more work up front, less work down the line plus it didn’t take away from the look of the garden…yes the lines have to go UNDER the bricks, one of the reason’s he said professional.
if you do hoses with drips…then have small connecting hose to go over sidewalks so the only you have to do is unscrew them from the ones in the beds…or you could build mini bridges of them. He did that for the neighbor.
Chris Pederson says
Thanks for mentioning that if you live in a region with moderate winters then you will need to dismantle your system and store it somewhere dry. I really want to get a drip irrigation system. It would be nice to have it for the summer but I live in a cold area so I’ll have professionals set it up and take it down too.