Last updated on August 15th, 2022
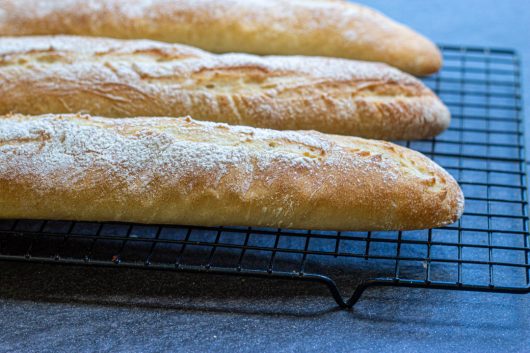
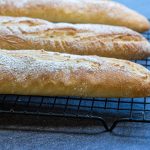
Here’s the printable recipe from my “Let’s Make Baguettes” video that was recently published on YouTube. The baguettes in question have a crackling-crisp crust, a yeasty aroma, and a chewy interior. The no-knead dough is made with only flour, salt, yeast, and water!
While the dough is a cinch to make, forming it into long, tapered loaves takes a bit of practice. But if I can master the shaping technique, then YOU can master the shaping technique! The video above will show you everything that words alone can not. (For more bread recipes, get my email updates and/or subscribe to my YouTube channel.)
Baguette Pan
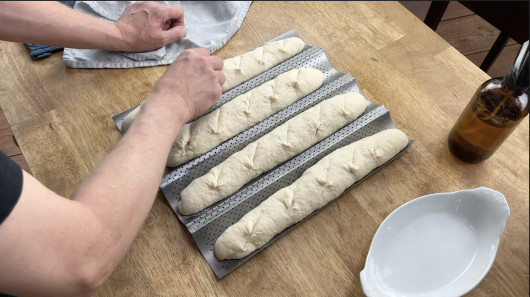
To make life easier, I rise and bake my baguettes in a 4-slot baguette pan. The pan works like a charm, as it allows the baguettes to rise up, not out. Perforations on the pan permit the loaves cook evenly on the bottom. There’s no need for a baking stone or a baking steel in the oven. You can purchase the pan on Amazon, just as I did. Click here to order.
Crusty No-Knead Baguettes
Ingredients for 4 (12-14-inch-long) loaves:
500 grams (3 1/2 cups) bread flour. I weigh my flour for accuracy, just as you should.
10 grams (2 teaspoons) salt. Ordinary table salt is what you want here.
350 grams ( 1 1/2 cups) lukewarm water.
7 grams (2 1/4 teaspoons) active dry or instant yeast.
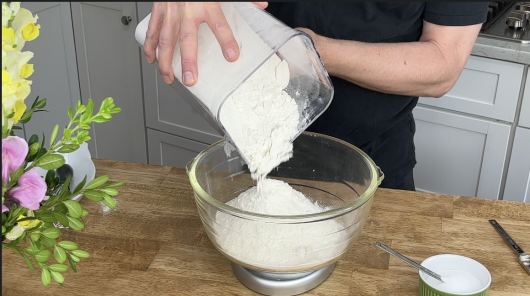
Making the baguette dough — In a large bowl, whisk together the flour and salt. In a separate bowl, whisk together the water and yeast. Add the yeast mixture to the flour mixture, and stir with a wooden spatula or spoon until all of the flour is moistened. Cover the bowl with a damp towel or cling film, and let it rest at room temperature for 30 minutes.
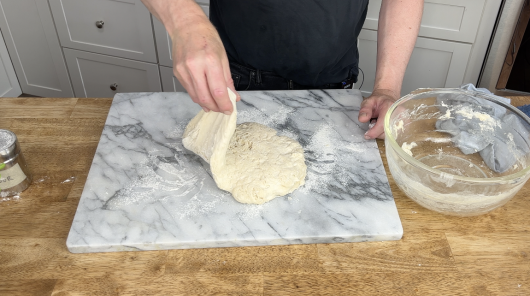
The first fold — Lightly flour your work surface, and then turn the dough onto it. Using your thumb and two fingers, grab any edge of the dough, lift it, stretch it, and then fold it back onto the center of the dough. Repeat this process all around the dough. The goal here is to create a tight ball. Lightly grease the mixing bowl (you don’t have to wash it out first). Return the dough to the bowl with its smooth side facing up. Cover and rest the dough for 30 minutes.
The second fold — Invert the bowl onto the lightly-floured work surface, and let the dough dislodge itself naturally. Repeat the same stretch-and-fold business as described in the previous step. Once again, return the dough to the bowl with the smooth side up. Cover and rest for 30 minutes.
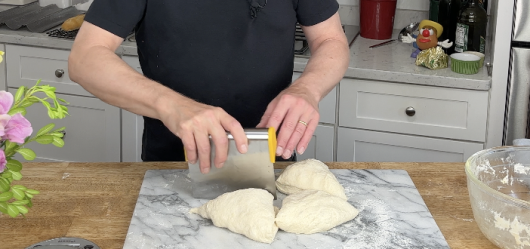
Dividing and Pre-Shaping the dough — By now the dough will have risen considerably. Once again, invert the bowl and let the dough drop naturally onto the lightly-floured work surface. Divide the dough into 4 segments — each piece should weigh approximately 215 grams. Roll each segment into a cigar shape. Dust with flour, cover with a dry cloth or some cling film, and let rest, seam-side-down, for 10-15 minutes.
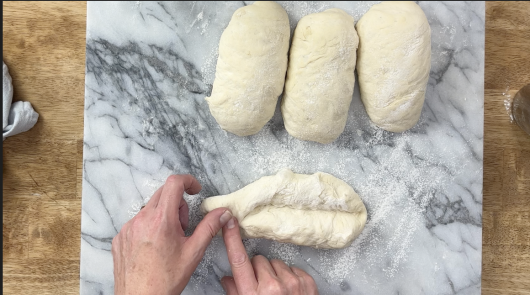
The Final Shaping — Take one of the pre-shaped dough segments, turn it seam-side up, and gently flatten it with your fingers into a rough square. Use your fingertips to make a horizontal ridge through the center of the square. Roll over the upper half of the dough to meet the center ridge, and press to seal it there. Continue rolling until you’ve achieved a cigar shape, and then pinch the seam to seal it. (Hint: Watch the video.)
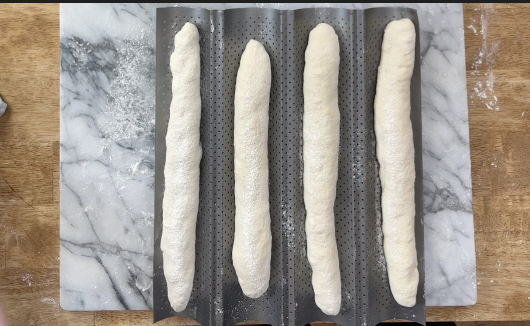
Use your palms to roll the baguette to 12-14 inches in length. Place seam-side down in a slot of the baguette pan. Shape the remaining baguettes and place them on the baguette pan. Dust the tops with flour and then cover and let rest until nearly doubled in volume — about 45 minutes.
Preparing the oven — Meanwhile, place a shallow roasting pan on the bottom rack of the oven. Preheat the oven to 475°F. Also, bring a kettle of water to a boil.
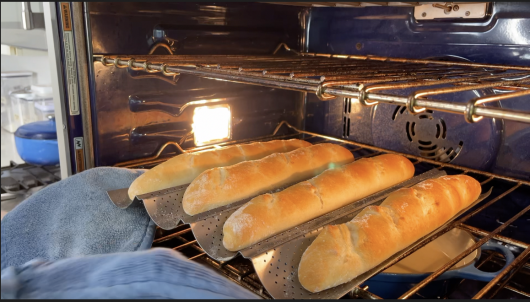
Baking the baguettes — When you are ready to bake, use a bread lame or an extremely sharp knife to make a few diagonal slashes down the middle of each loaf. Then put the baguette pan on the center rack of the preheated oven, and immediately pour approximately 2 inches of the boiling water into the roasting pan below. Promptly close the oven door and bake until the loaves puff and turn a rich golden brown — 15-20 minutes.
Tip for an extra-nice crust — To achieve the crispiest crust, turn the oven off after the baguettes have finished baking. Remove the pan of water, and slide the baguettes off their pan and directly onto the oven rack. Allow the oven door to remain open just an inch or two as the loaves finish cooling.
 I hope you will give these baguettes a try some day. They are a fun bread to master! xKevin
Another great bread you might like to try: Rustic Potato Bread
Here’s the baguette recipe in printable format:
Crusty No-Knead Baguettes
Equipment
- A 4-slot baguette pan
Ingredients
- 500 g (3 1/2 cups) bread flour
- 10 g (2 teaspoons) salt
- 350 g (1 1/2 cups) lukewarm water
- 7 g (2 1/4 teaspoons) active dry or instant yeast
Instructions
Mixing the dough
- In a large bowl, whisk together the flour and salt. In a separate bowl, whisk together the water and yeast. Add the yeast mixture to the flour mixture, and stir with a wooden spatula or spoon until all of the flour is moistened. Cover the bowl with cling film or a damp towel and let rest at room temperature for 30 minutes.
The first fold
- Lightly flour your work surface, and turn the dough onto it. Using your thumb and two fingers, grab any edge of the dough, lift it, stretch it, and then fold it back onto the center of the dough. Repeat this process all around the dough. The goal here is to create a tight ball. Lightly grease the mixing bowl (you don't have to wash it out first). Return the dough to the bowl with its smooth side facing up. Cover and rest the dough for 30 minutes.
The second fold
- Invert the bowl on the lightly-floured work surface, and let the dough dislodge itself naturally. Repeat the same stretch-and-fold business as described in the previous step. Once again, return the dough to the bowl with the smooth side up. Cover and rest for 30 minutes.
Dividing and pre-shaping the dough
- By now the dough will have risen considerably. Invert the bowl and let the dough drop naturally onto the lightly-floured work surface. Divide the dough into 4 segments -- each piece should weigh approximately 215 grams. Roll each segment into a cigar shape. Dust with flour, cover with a dry cloth or some cling film, and let rest, seam-side-down, for 10-15 minutes.
The final shaping
- Take a pre-shaped dough, turn it seam-side up, and gently flatten it with your fingers into a square shape. Use your fingertips to make a horizontal ridge through the center of the square. Roll over the upper half of the dough to meet the center ridge, and press to seal it there. Continue rolling until you've achieved a cigar shape, and pinch the seam to seal it.
- Use your palms to roll the baguette to 12-14 inches in length. Place seam-side down in a slot of the baguette pan. Shape the remaining baguettes and place them on the baguette pan. Dust the tops with flour and then cover and let rest until nearly doubled in volume -- about 45 minutes.
Preparing the oven
- Meanwhile, place a shallow roasting pan on the bottom rack of the oven. Preheat the oven to 475°F. Also, bring a kettle of water to a boil.
Baking the baguettes
- When you are ready to bake, use a bread lame or extremely sharp knife to make a few diagonal slashes down the middle of each loaf. Then put the baguette pan on the center rack of the preheated oven, and immediately pour approximately 2 inches of the boiling water into the roasting pan below. Promptly close the oven door and bake until the loaves puff and turn a rich golden brown -- 15-20 minutes.
A tip for extra-crusty bread
- To achieve the crispiest crust, turn the oven off after the baguettes have finished baking. Remove the pan of water, and slide the baguettes off their pan and directly onto the oven rack. Allow the oven door to remain open just an inch or two as the loaves finish cooling.

Toni O'Brien says
This doesn’t look like a process you can do with gluten free flour. Shucks; it looks delicious.
Am I right?
Sandy S. says
Could these be made into rolls instead?
King Soopers used to have these in their bakery and they were delicious filled with lunch meats and cheese.
Kevin Lee Jacobs says
Hi Toni – You are correct — baguettes are made with wheat flour.
Hi Sandy S. – You can absolutely form this dough into rolls. Enjoy!
Brian says
I tried the cabbage casserole…wonderful tender cabbage texture.
Kevin Lee Jacobs says
Hi Brian – Glad you enjoyed it!
Dominique. says
Hello Kevin, little * Me* from New Zealand ! I thought I would give a try at making your baguettes ( with a glass of red and filled with saucisson and brie, would be my choice !!)
They are in the oven at present and starting to smell divine!! Did not have the special mould you show us , so will see what they look like without it !
Pretty easy to make, just a bit time consuming… but then….I am now retired anyway!!
Thank you for visiting my iPad every week. I do enjoy your recipes and little comments.
Take care and have a great day.
Ellen says
Hello! I bought that very baguette pan more than a year ago and have yet to use it. Now, I’m inspired! Thanks so much for the video tutorial — that’s essential for learning the proper technique.
Debbie Shannon says
I followed the steps exactly and my dough was not sticky. It is more rubbery. Should I toss this out and start over?
Honeybee says
Kevin I feel so accomplished being able to say-I can make baguettes.
It was difficult to not keep munching on the bread. So delicious.
Yes a bit time consuming but I was able to get alot done on each of the 30 minutes rest periods.
The link for the baguette pan was helpful. I always avoided baguettes thinking I had to use the special cloth.
Vaughn says
I made this before and it was great. Today I made it again and for some reason I put the oven to 375. It was baking 15 minutes before I realized it and raised to 475 for 10 minutes. I was prepared to toss it but lo and behold and it was really good. I took it out while I changed the temp and then put it in for those 10 minutes.
Luke says
I have failed at all other attempts to bake, but this worked perfectly.
Kimberly says
I’ve tried and tried for over 10 years off and on, and was never satisfied enough to make my bread worth the time and effort (and mess). Watched your video and was encouraged to try again! It worked! I forgot the lame step, but we’ve been enjoying crispy and fluffy baguettes this weekend. Next, to buy a more worthy quality of butter. Thank you, Kevin! You are a great teacher, and I am a teacher, and now a bread baker! You are bookmarked! Love your garden ideas too. After leaving my home state and living in CA and TX for 30 years, I’m back home in ND and looking forward to creating a variety of northern gardens on our property. It will have its challenges for sure.
Sofia says
this recipe never fails me, even with my janky oven that only goes up to 440 degrees. delicious!
Katie Flather says
I’m used to baking sourdough, so the process with these, the stretch and folds, the entire process is just so fun for me! I’m getting ready to start a “Bear Hug Bakery” to bake and give food to the homeless in my town. This recipe will definitely be a nice addition! Thank you!
Kathleen says
I made these and they are fantastic! The crumb is just right not to many holes making it suitable for all kinds of spreads ..Great for dipping! Making another batch today..I will keep these handy in the cupboard on a daily basis.
Thanks for the no knead great recipe!
Emma says
These turned out beautifully! I did the stretching and folding in the bowl, but otherwise followed the recipe to a T. Delicious and so pretty, too!
Franceen says
Is there a way to store the loaves or somewhere in the process where you could stop and refrigerate/freeze? There are only two of us and 4 loaves is a lot of bread to eat in one day. Thank you so much!